3. Base Configuration
Note
Objective of this chapter is to show how set up initial envoironment for ‘AD-Pro Authantication’ plugin.
3.1. Overview
For the “AD-Pro Authentication” extension, following components needs to be changed:
- Internet Information Services (authentication section),
- DNN Platform (adjust the folder permissions),
- DNN Platform (section “Admin->Site settings”),
- and at the end some setings inside “AD-Pro Authentication” module,
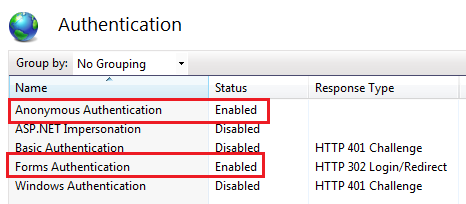
3.2. Initial IIS configuration
Before you install module:
Please make sure that in Internet Information Services (IIS) under ‘Authentication’ tab DNN Platform has settings as follows:
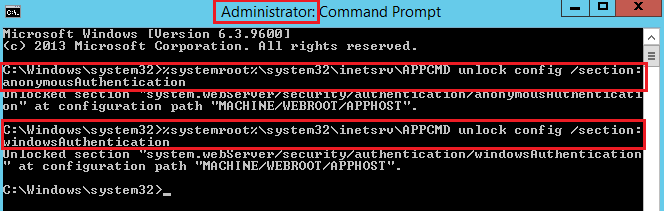
On the server where is the IIS, open ‘Command line’ (CMD) as ‘Run As Administrator’ and execute following commands. This will allow ‘AD-Pro Authentication’ plugin to automatically change ‘IIS-> Authentication’ settings for file:
DesktopModules/GS_ADProAuthentication/WinAuthSignIn.aspx:%systemroot%\system32\inetsrv\APPCMD unlock config /section:anonymousAuthentication %systemroot%\system32\inetsrv\APPCMD unlock config /section:windowsAuthentication
Note
To start cmd.exe with Administrative privileges:
Open the Start menu.
Press the windows icon key.
- Click on the Start windows icon icon at the left end of the taskbar.
- Type cmd.exe in the search box.
Press Ctrl + Shift + Enter.
This starts the Command Prompt as the Administrator user.
If these commands returns error like: Object ' UNLOCK CONFIG /SECTION:ANONYMOUSAUTHENTICATION' is not supported
the changes in the applicationHost.config file located in the %windir%\system32\inetsrv\config\ folder needs to be done. More info:
http://www.iis.net/learn/get-started/planning-for-security/how-to-use-locking-in-iis-configuration
3.3. Initial file permissions
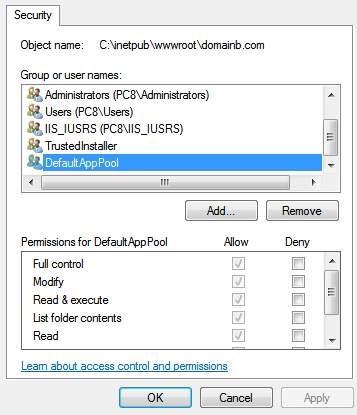
Make sure that file system permissions for directory where main DNN website is placed are correct.
The Application Pool Identity user should have permissions: read, write, modify.
Figure below describes correct permissions for DNN website located in folder: c:\inetpub\wwwroot\domainb.com,
in this case Application Pool Identity user is called DefaultAppPool.
To set these permissions you can use following command executed under Administrator rights:
icacls c:\inetpub\vhosts\[DNN-SITENAME] /grant "IIS APPPOOL\[AppPoolNAME]":(OI)(CI)(M)
3.4. Initial AD configuration
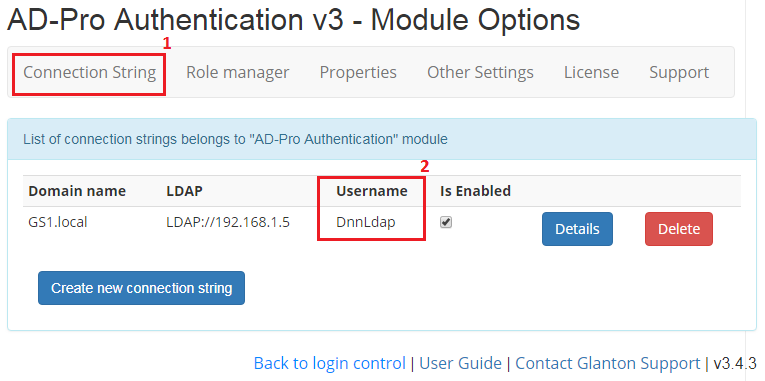
The Active Directory user on behalf of which an LDAP connection is set up between DNN website and Active Directory system need to have special permissions. AD identity sepecified in “Connection String”, must have permissions to read AD groups, users, and user properties.
Below are the steps to set necesary permissions:
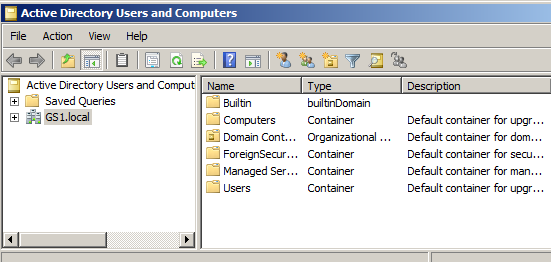
- In Active Directory system, open the “Active Directory Users and Computers” window, see figure below.
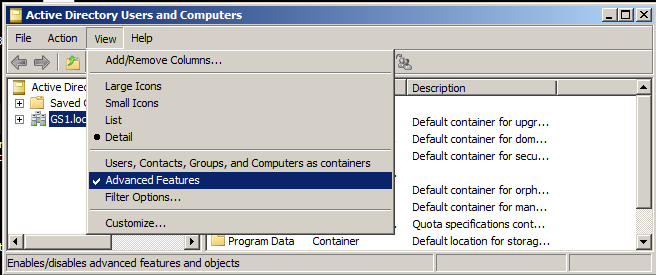
- Under “View” enable the “Advanced Features”, see figure below.
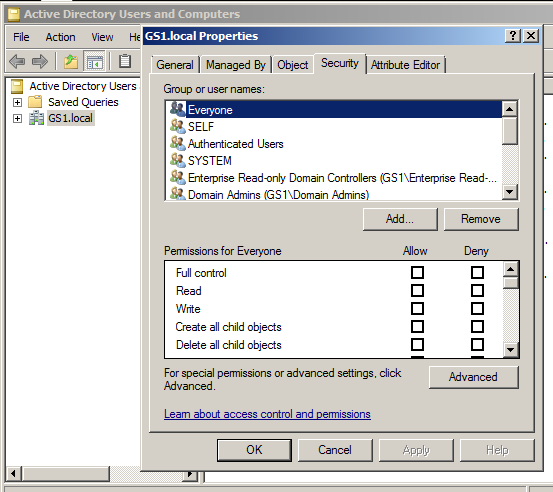
- Right click on the “Domain” node and select the “Properties” from the context menu. Select the “Security” tab. And click on “Advanced” button, see figure below.
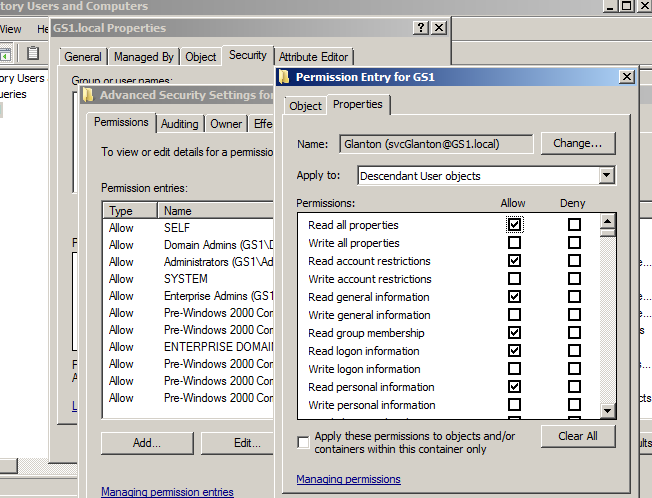
- Click button “Add…” to add a user that is specified in “Module options-> Connection String”.
- From the “Permission Entry” window select “Properties” tab. In “Apply to” select “Descendant Users object”. Make sure that following attributes are enabled: “Read all properties” and “Read Member Of”, see figure below.
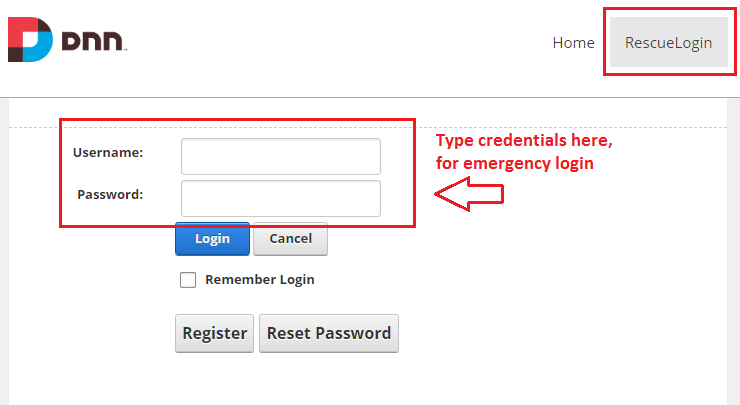
3.5. Rescue login
Note
Rescue login protect your DNN website against failures in ‘AD-Pro Authenitcation’ module.
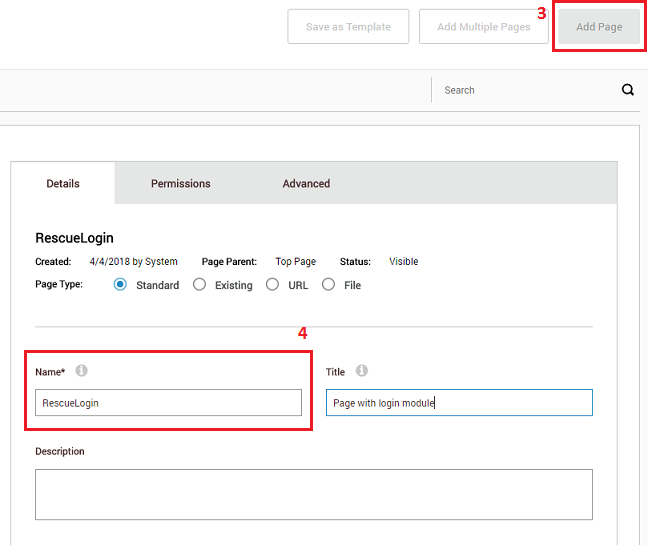
The login module has strategic importance for a website. If it fails you will not be able to sign in to DNN. Please execute steps below to create ‘Rescue Login’ page. This will allow you to sign in to DNN if something bad will happen.
- Create new DNN page, see figures below.

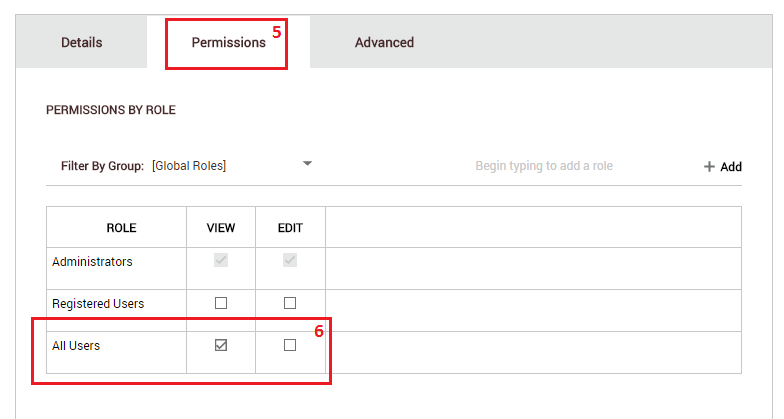
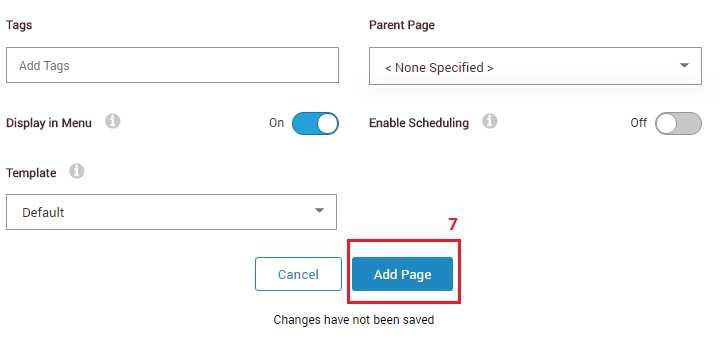
- Set permission for that page ‘View’ for ‘All users’. Click on ‘Add Page’ button to close wizard.
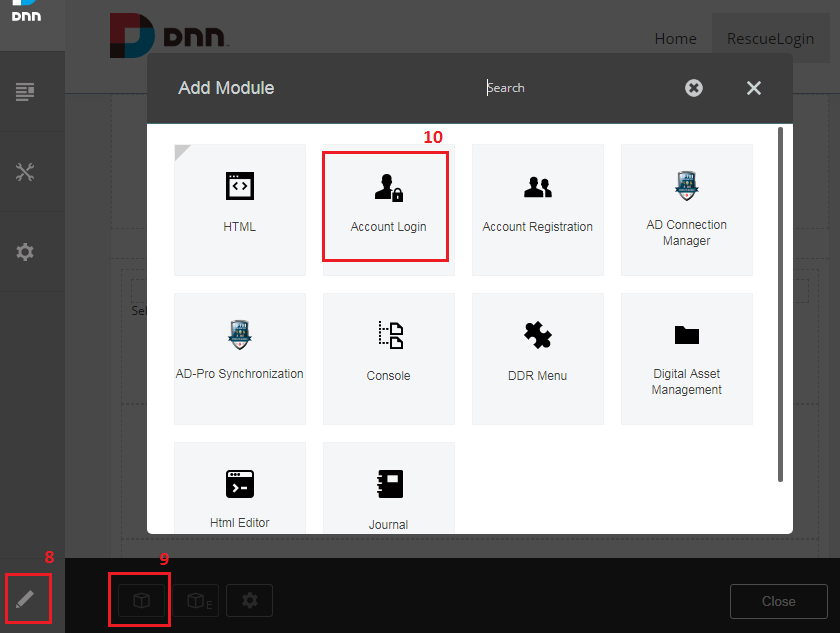
- On newly created page put ‘Account Login’ module, see image below.
- At the end you should have a page like on figure below. Sign in to DNN using this page, to test if it’s working properly.
3.6. Dedicated login page
It’s good to create dedicated page for the ‘AD-Pro’ login module. Please follow steps below to do that.
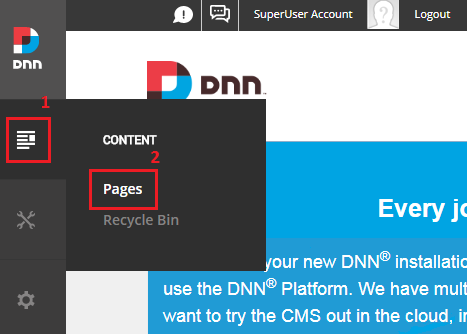
- Sign in as DNN Administrator or Host, then select ‘Pages’ from the DNN menu to open the wizard, see figure below.
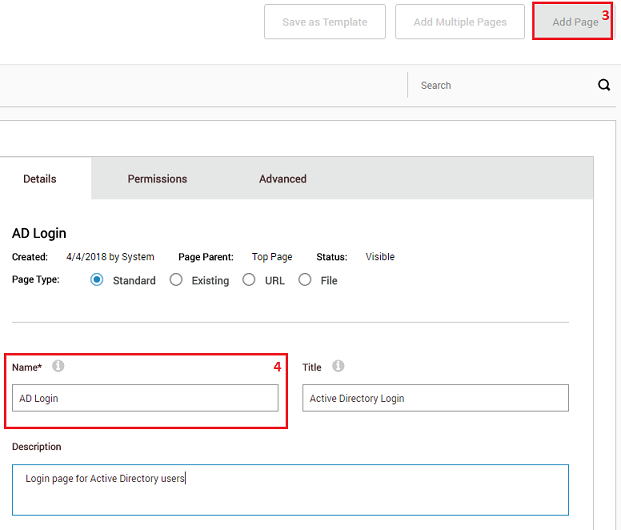
- Click ‘Add Page’ and enter page name, see figure below.
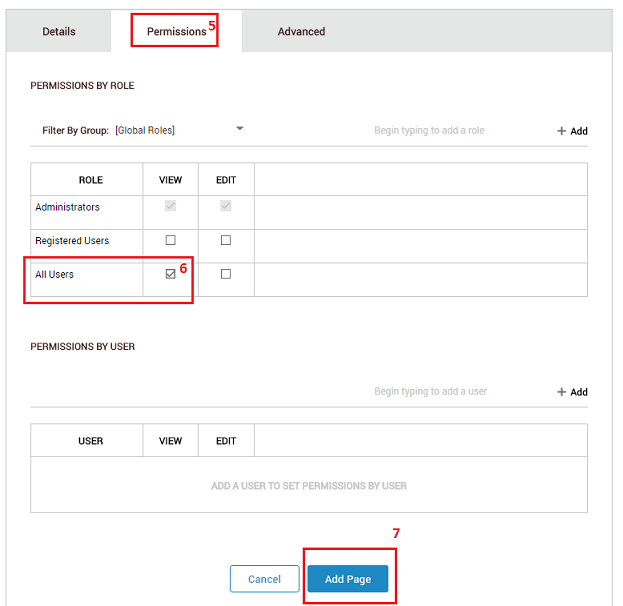
- It’s very important to set correct permissions for the login page. Make sure that it’s visible for ‘All Users’. Then click ‘Add page’ to close the wizard. See figure below.
- At the end, you should have new DNN page, where the login module will be putted. Page doesn’t needs to be visible in the menu.
3.7. Add ‘Account Login’ module to a page
Login page needs to have core DNN login module, which is ‘Account Login’ module. It’s important to set permissions for that module: ‘View’ only for ‘Administrators’. Below are list of the steps to accomplish this task.
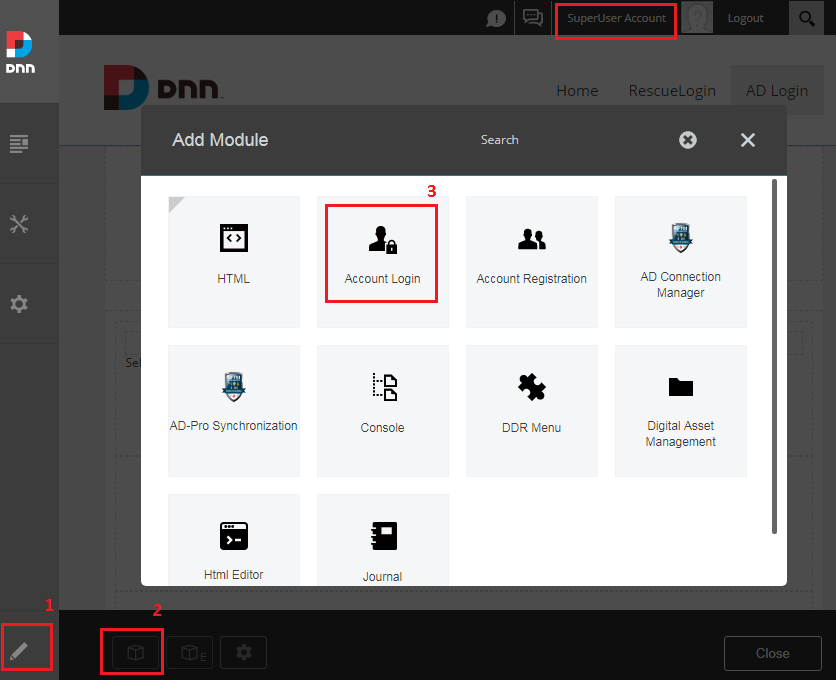
- Sign in as DNN Administrator or Host, set DNN into ‘Edit Mode’ and put ‘Account Login’ module on a page, see figure below.
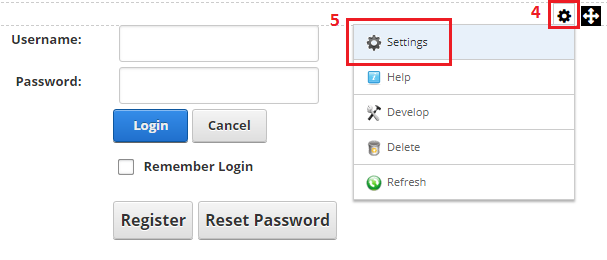
2. When the module is on a page, it’s time to set permissions for it. Plugin needs to be visible only for ‘Administrators’. Click on ‘Gear’ icon, then select ‘Settings’ from menu, see figure below.
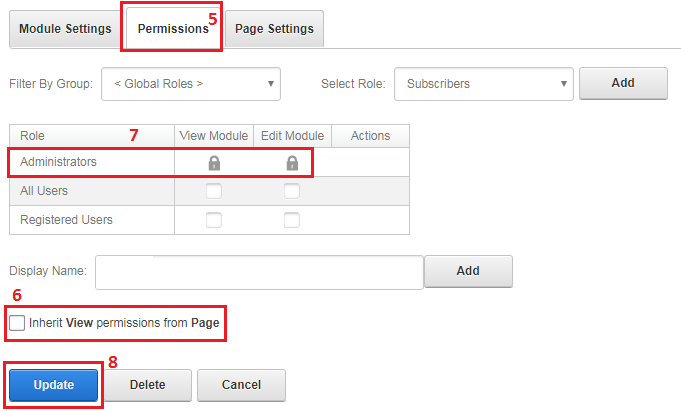
3. Inside the module settings panel, select Permissions tab.
Then make sure that Inherit View permissions from Page is disabled and module is visible only for ‘Administrators’.
If everything is set, click on Update button, see figure below for more info.
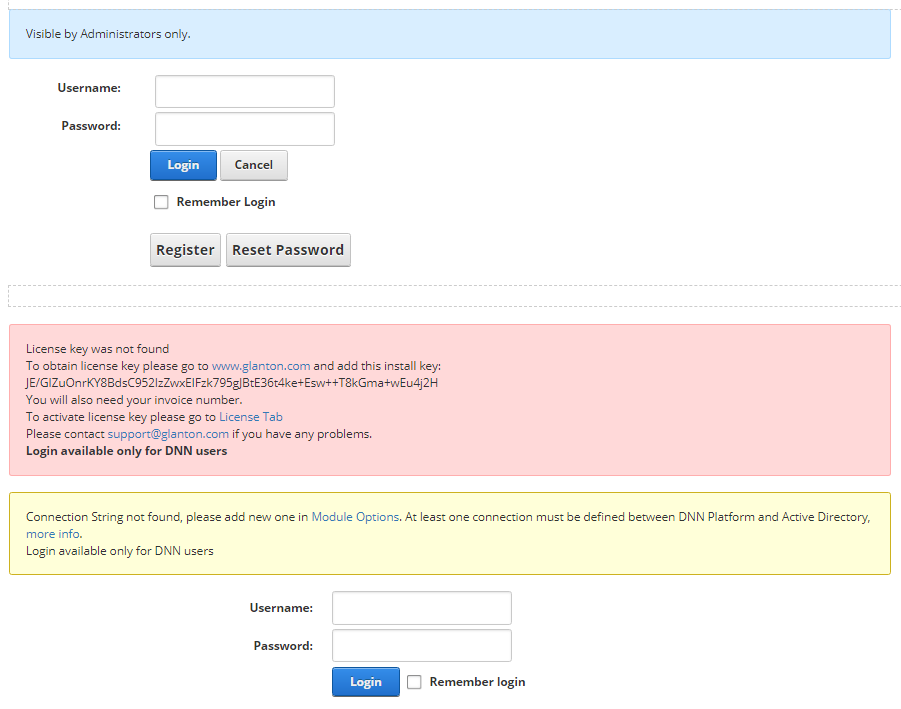
- At the end of this step ‘Account login’ module will be displayed with new info at the top (blue background), see figure below.

3.8. Add ‘AD-Pro Authentication’ module to a page
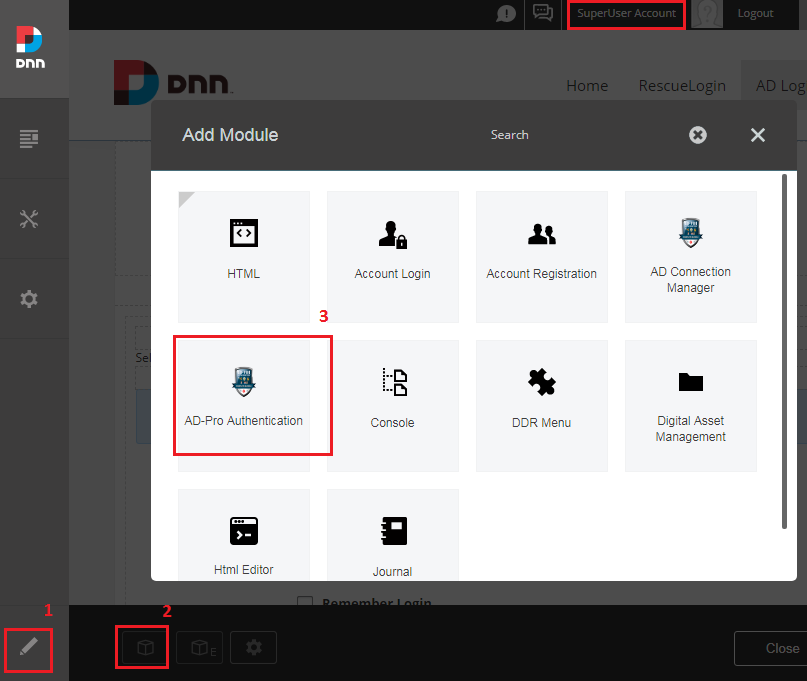
- Sign in as DNN Administrator or Host, set DNN into ‘Edit Mode’ and put ‘AD-Pro Authentication’ module on a page, see figure below for details.
- At the end of this process on one page should be two modules, like on figure below:
- first ‘Account Login’ module (visible only for Administrators)
- second ‘AD-Pro Authentication’ module (visible for all)
3.9. Setting up new default login page
By default DNN login link redirects users to standard login form that doesn’t have “AD-Pro Authentication” plugin.
Note
This section describes how redirects users to login form, where “AD-Pro Authentication” exist.
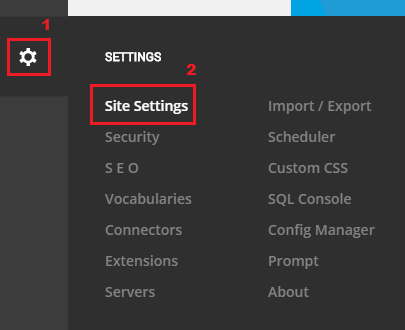
Sign in as DNN Administrator or Host
Go to “Site Settings”, see figure below.
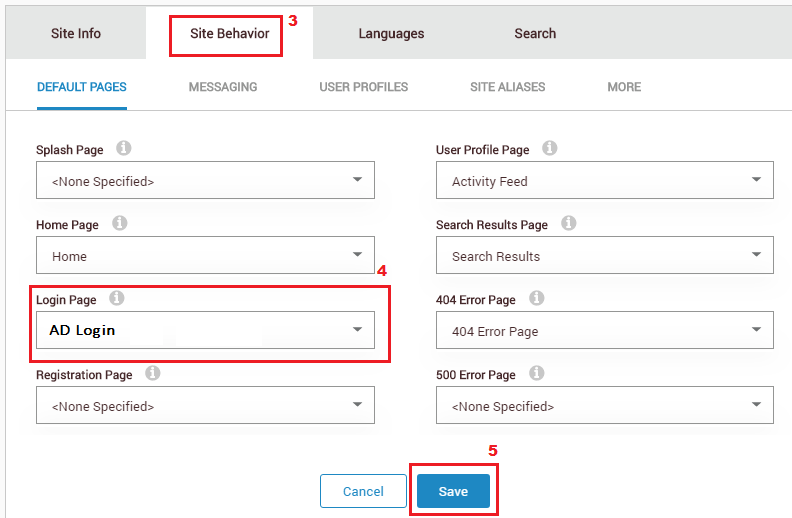
Go to “Site Behavior” tab, then set new page under “Login Page”, see example on figure below.
Now when both modules are on the page it’s time to configure connection to the Active Directory system. This task is described in Configuring connection to Active Directory.