6. Advanced Configuration
6.1. Self-Service Password Reset (SSPR)
Tip
It is estimated that atleast 20 percent help desk tickets are related to password resets and on an average each change password ticket is time consuming (about 20 minutes) thus prevents the helpdesk from focusing on more pressing issues.
Note
Self-Service Password Reset allows an end user to self reset his domain password in Windows Active Directory (and therefore in DNN). And this happens remotely from a web browser without calling the helpdesk is an essential requirement.
Users requesting password self-service are required to answer a set of pre-defined security questions and / or go through an SMS / E-mail based PIN code verification, which ensures that the password reset process remains highly secure. All password changes are scrutinized against Windows Active Directory domain password policy.
We can distinguish three major use cases for this task:
Self-service password change. The user knows their password but wants to change it to something new.
Self-service password reset: The user is unable to sign in and wants to reset their password by using one or more of the following validated authentication methods:
- Send a text message to a validated mobile phone.
- Make a phone call to a validated mobile or office phone.
- Send an email to a validated secondary email account.
- Answer their security questions.
Self-service account unlock: The user is unable to sign in with their password and has been locked out. The user wants to unlock their account without administrator intervention by using their authentication methods.
Users have two options to access SSPR: from a web browser and from the Windows Logon screen. In our case we will focus on web browser, and below are the steps to enable Password Reset link from the web browser login screen:
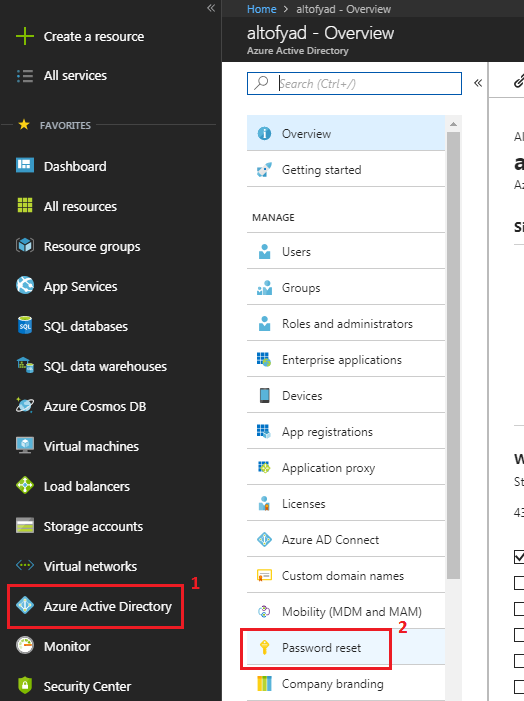
Sign in to your Azure portal.
Go to “Azure Active Directory” and click on “Password reset” link, see figure below.
Select
Allthen clickSave, see figure below.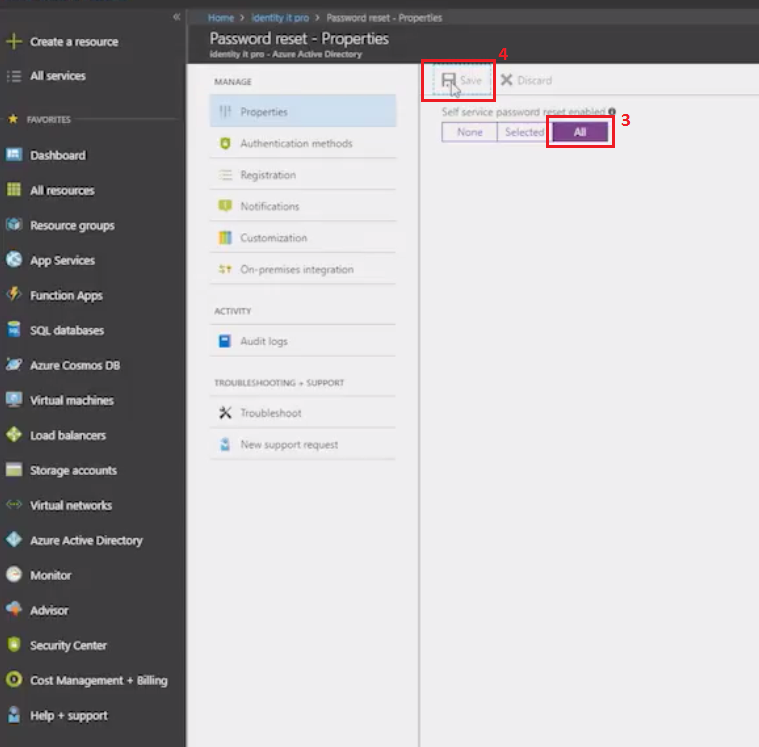
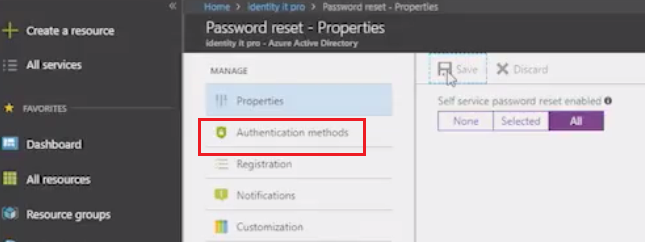
Optionally you can adjust authentication methods, like: email, mobile phone, office phone and security question. See figure below.
6.2. DNN Username Formats
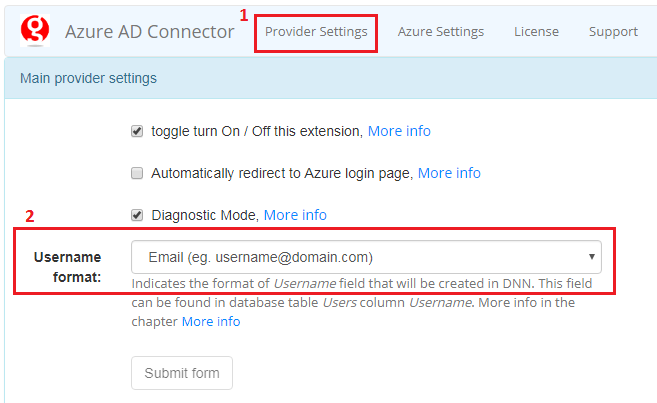
“AD-Pro Azure AD Connector” allows you determine the format of Username field that will be saved in database.
DNN usernames are keeped in table Users in column Username.
Username field must be unique across all DNN portals, consider that before you will select right format.
“Username format” setting can be found under the tab “Provider Settings”, see figure below.
| Username Format | Description |
|---|---|
| Default | Username will be equal to the first part of email address, string before @ (eg. john). |
| Default with Portal Suffix | To the default username portal suffix will be added (eg. john_1). This option allows provider to work in multi DNN portal environment. |
| Default Cross Portal | Username will be equal to default, but allows work in multi DNN portal environment (eg. john). |
| Username will be same as email address (eg. john@domain.com) | |
| Email with Portal Suffix | Username composed with email and suffix, that is equal to the portal id (eg. john@domain.com_1). This option allows provider to work in multi DNN portal environment. |
| Email Cross Portal | Username will be same as email (eg. john@domain.com), but this option allows provider to work in multi DNN portal environment. |
| Azure Prefix | Username will be saved as email address, but with the ‘Azure’ prefix at the beginning (eg. Azure-john@domain.com). This option clearly separates Azure AD users in DNN. |
6.3. Automatic login - SSO
By default using “AD-Pro Azure AD Connector” user needs execute few steps to go through login procedure. Usually these steps are:
- Navigate to DNN login page, eg. www.my-dnn.com/login.
- Click button “Login to Azure Active Directory”.
- This redirects user to “Azure AD” login website.
- On “Azure AD” login page user needs to enter his credentials (username and password), then click “login” button.
- User is redirected back to the DNN website as a registered user.
You can simplify this process by enabling option “Automatically redirect to Azure login page”, that is located in “Provider Settings”, see figure below:

If option “Automatically redirect to Azure login page” is enabled login process is much easier. Step two is ommited and after the DNN login button is clicked, user is immediately redirected to “Azure AD” login endpoint.
To sign in to DNN as a normal DNN user, for example DNN host, apply special query string param: sso=false.
This will stop automatic redirection to “Azure AD” login page.
For example url to login page can look like this: www.my-website.com/login?sso=false
6.4. User profile fields
At the login process following DNN user profile fileds will be populated.
Azure AD requires the User.Read or higher to read these properties.
| Azure AD filed | DNN filed |
|---|---|
| userPrincipalName | Username |
| givenName | First Name |
| surname | Last Name |
| displayName | Display Name |
| mail (if it’s empty ‘userPrincipalName’ will be used) | |
| city | City |
| country | Country |
| postalCode | Postal Code |
| streetAddress | Street Address |
| mobilePhone | Cell |
| businessPhones | Telephone |
6.5. Azure Active Directory B2C
Customers can access your DNN website by sign in with their existing social accounts or personal emails. Azure Active Directory B2C supports Facebook, Microsoft Accounts, Google+, LinkedIn, and many others, or you can add your own.