6. Advanced Settings
Objective
Here are described more advanced technics. It’s not necessary to read this in order to configure simple login scenario, but if your users already can sign in, here you can find info how to adjust or optimize that process.
6.1. Role Mapping
Objective
Explains how to push Salesforce user roles to corresponding DNN user profile.
Note
In example below we created mapping for three Salesforce user roles: “Intranet”, “Editors”, “Administrator”. Naturally plugin can sync any other role.
“Salesforce Authentication SPI” allows copy Salesforce roles to DNN user profile on login process. If role doesn’t exist in DNN, it will be automatically created. Salesforce user roles are trasfered to DNN via two custom properties:
- first property of a type
Picklist (Multi-Select), that contains list of Salesforce user roles,- second property of a type
Formulathat will dynamically populate property above, depending on whether or not user belongs to role,
Below is explained how to create these properties.
6.1.1. Property “RoleNames”
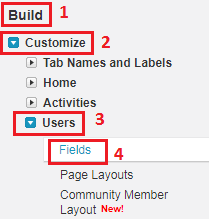
Go to: Build-> Customize-> Users-> Fields, see figure below
Scroll down to section “User Custom Fields” and click on button
New. This will start simple wizard that will create new user property.For “Data Type” select
Picklist (Multi-Select)and clickNext, see figure below.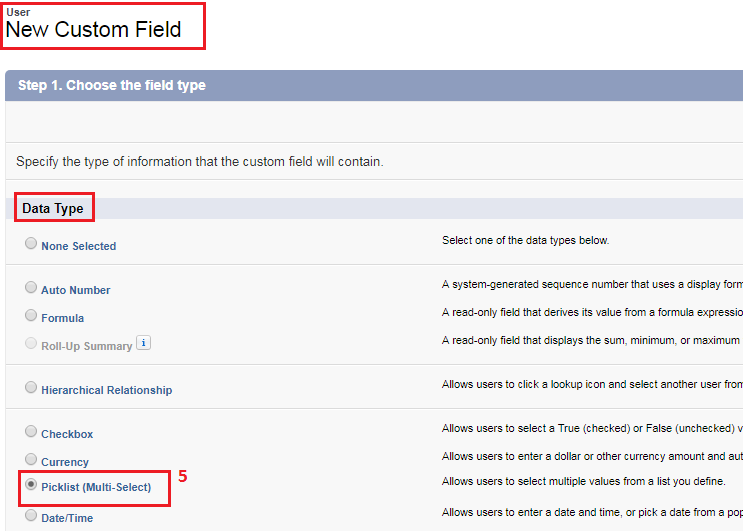
Set property label to
RolesNames, select option “Enter values, with each …”. Then enter role names and clickNext, see figure below.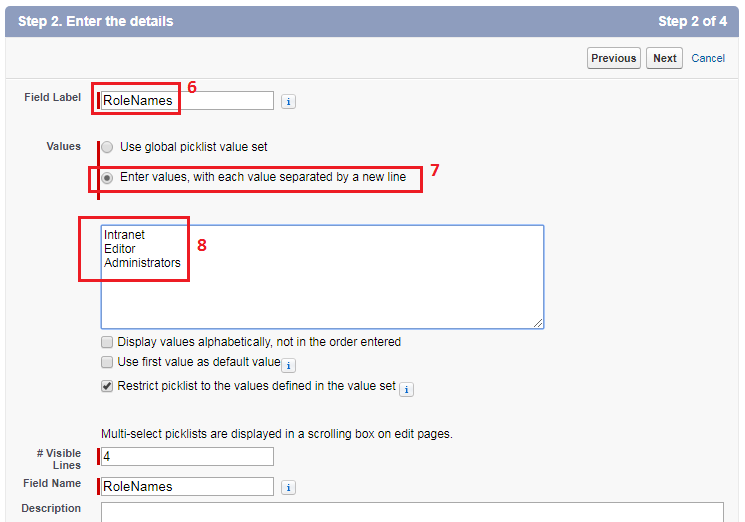
On the “Step 3. Establish field-level security” click
Next, see figure below.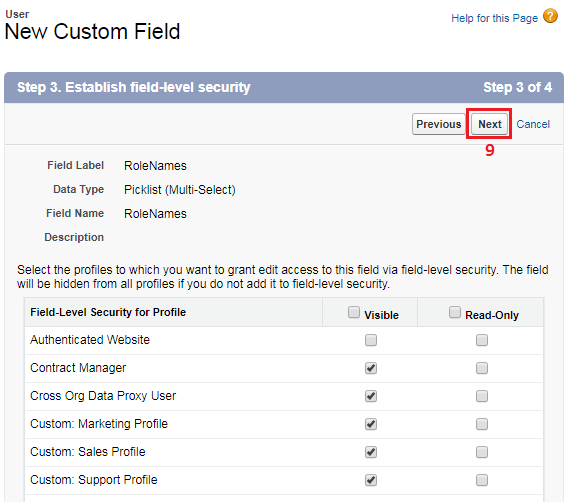
On the “Step 4. Add to page layouts” click
Save, see figure below.
Newly created property object is avaialble in section “User Custom Fields” (under the “Build-> Customize-> Users-> Fields”). Check the “API Name”, this value will be used to create second property, see figure below.

6.1.2. Property “RoleValues”
Go to: Build-> Customize-> Users-> Fields, see figure below
Scroll down to section “User Custom Fields” and click on button
New. This will start simple wizard that will create new user property.For “Data Type” select
Formulaand clickNext, see figure below.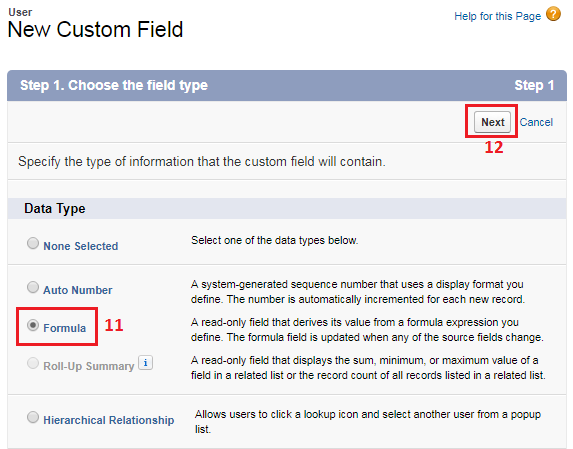
For “Filed Label” enter
RoleValuesand for “Return Type” selectText, then clickNext, see figure below.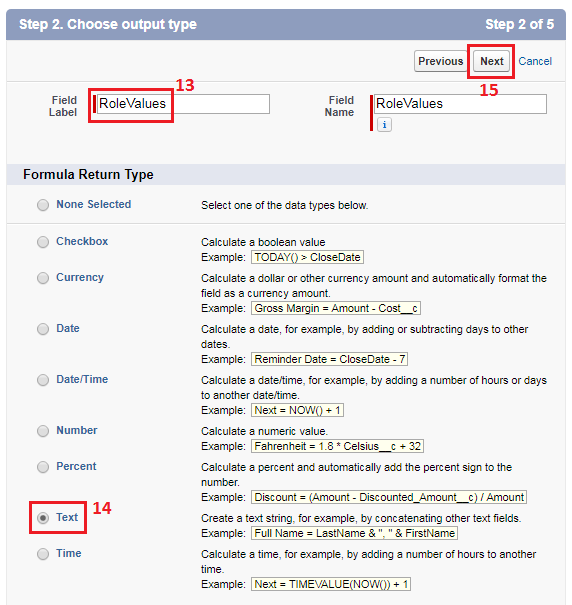
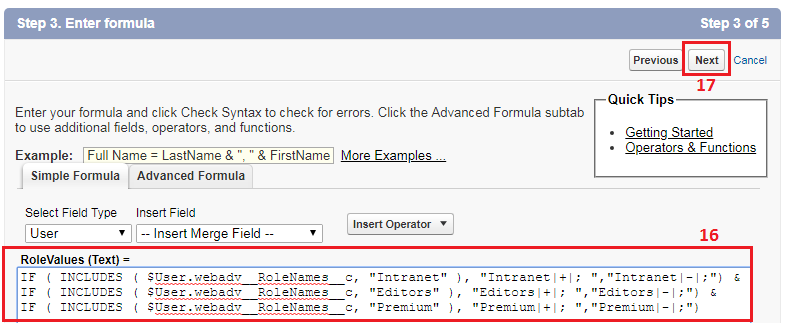
For the textbox named “Role Values(Text)” enter following code snippet and click
NextWarning
In our case “API Name” for property “RoleNames” is “webadv__RoleNames__c”. Please be aware that for your Salesforce instance this could be vary.
IF ( INCLUDES ( $User.webadv__RoleNames__c, "Intranet" ), "Intranet|+|; ","Intranet|-|;") &
IF ( INCLUDES ( $User.webadv__RoleNames__c, "Editors" ), "Editors|+|; ","Editors|-|;") &
IF ( INCLUDES ( $User.webadv__RoleNames__c, "Premium" ), "Premium|+|; ","Premium|-|;")
See image below.
On the “Step 4. Establish field-level security” click
Next, see figure below.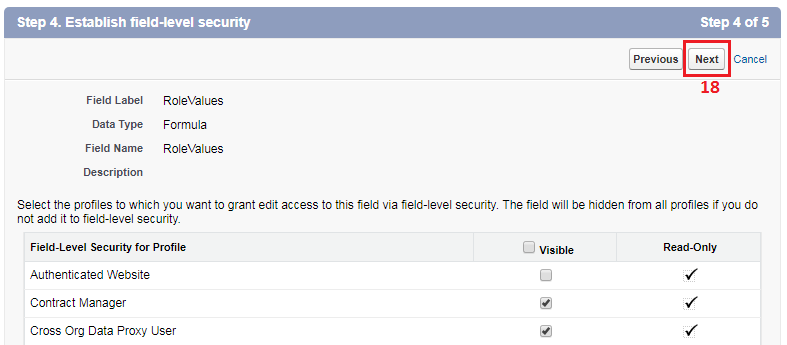
On the “Step 5. Add to page layouts” click
Next, see image below.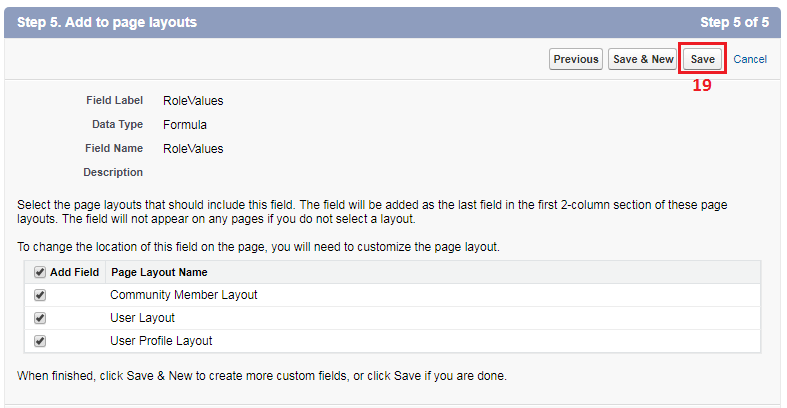
If everything is correct, under section “” should be two new properties, see figure below.

6.1.3. Configure “Connected App”
This section will show how to expose newly created properties outside of Salesforce. To do that we will add profile mappings. This task is very similar to Profile Mapping.
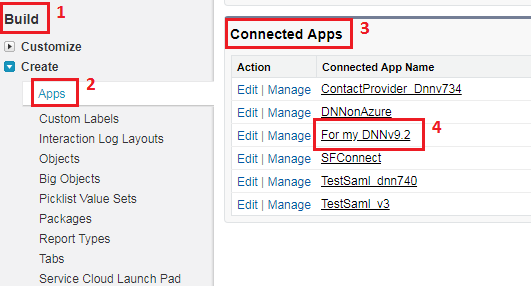
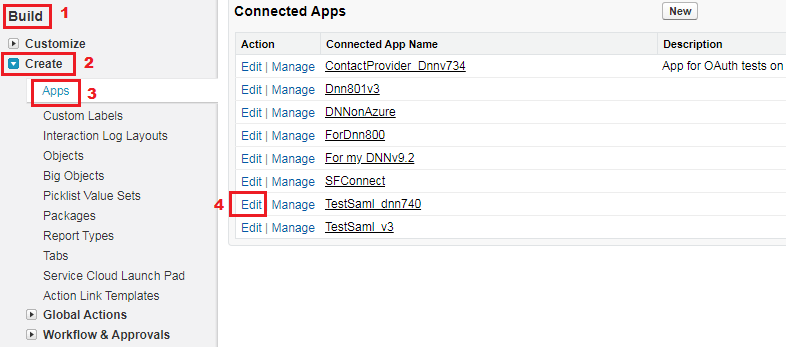
Go to Setup-> Build-> Create-> Apps
Scroll down to section “Connected Apps” and click on your connected app. In this case “Connected Apps” name is “For my DNNv9.2”, but it could vary for your Salesforce instance.
Scroll down to section “Custom Attributes” and click on
Newbutton, see figure below.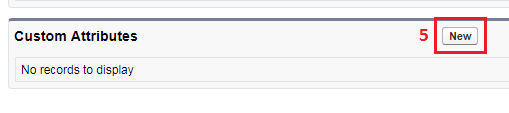
In panel “Create Custom Attribute”, for textbox
Keyenter valueRoles, and click on buttonInsert Field, see figure below.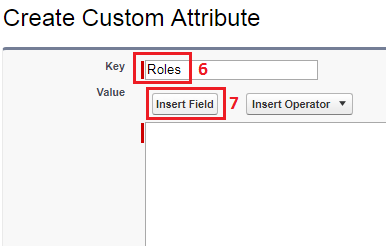
Inside popup “Insert Field”, click on
$User>thenRoleValuesand click on buttonInsert, see figure below.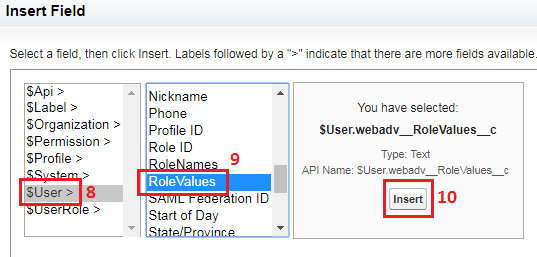
Click on
Savebutton, see image below.
The mapping was successfully created and “Connected App” will export Salesforce user roles to DNN. From DNN perspective this propety will be visible as
Roles.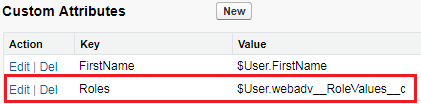
6.2. Single Log-out (SLO)
Objective
Explains how to log off from Salesforce and DNN website using one-click button.
Note
In order to SLO, DNN website needs to be working at the top of HTTPS protocol.
Following coordinates are required for SLO:
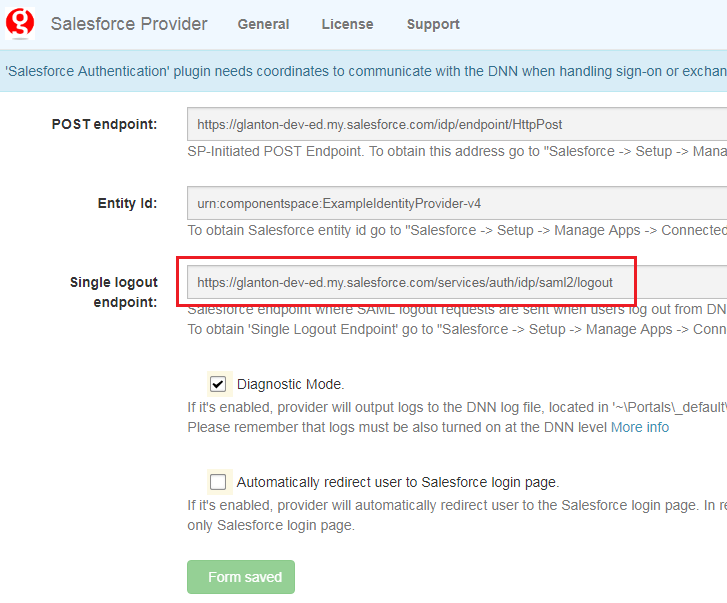
- Single Logout Endpoint - it’s a Salesforce endpoint where DNN will send SAML LogoutRequest. Needs to be applied on DNN side in “Salesforce Authentication SPI” settings. Usually it’s something like ‘https://my-company.salesforce.com/services/auth/idp/saml2/logout’
- DNN logout url - usually it’s something like ‘https://DnnWebsite.com/logoff’. Needs to be applied inside Salesforce “Connected App”.
6.2.1. Turning SLO on Salesforce
First we need enable Single Log-out inside Salesforce organization. Follow steps below.
Go to Setup-> Build-> Create-> Apps
Scroll down to section “Connected Apps” and click on “Edit” near your connected app, see figure below.
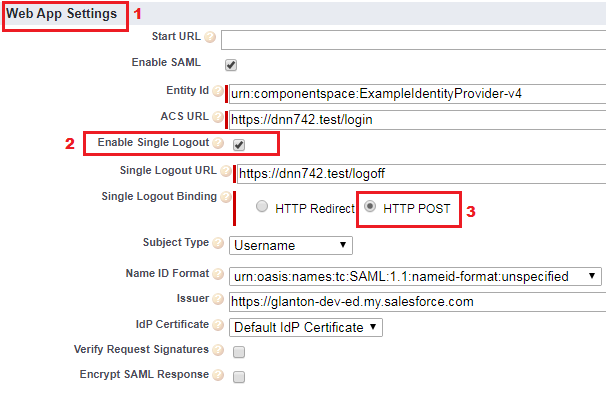
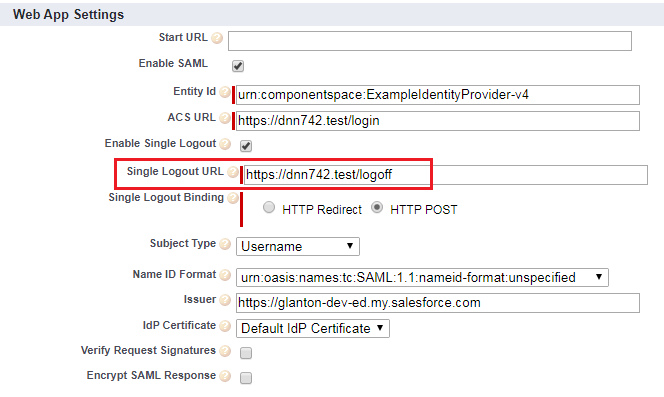
Go to section “Web App Settings”, tick option “Enable Single Logout”, then under “Single Logout Binding” select “HTTP POST”, see figure below.
Now the SLO is partially enabled, see steps below to complete the configuration.
6.2.2. Setting up Single Logout Endpoint
In this section we well get Salesforce “Single Logout Endpoint”. DNN website need it to send log-off request.
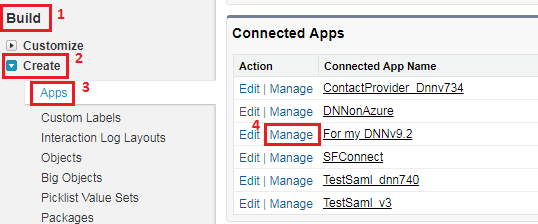
Go to Setup-> Build-> Create-> Apps
Scroll down to section “Connected Apps” and click on ‘Manage’ near your connected app, see figure below.
Scroll down to section “SAML Login Information” and copy “Single Logout Endpoint”, see figure below.
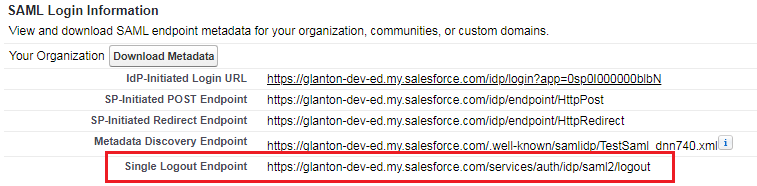
This address needs to be copied to “Salesforce Authentication SPI” config, see figure below.
6.2.3. Setting up DNN logout URL
We need to inform Salesforce what is the DNN logout url. Usually DNN logoff page has following url: ‘https:\www.MyDnnDomain.comlogoff’. To apply that URL in Salesforce follow steps below.
Note
Salesforce accepts only https:// address for the “Single Logout URL” property.
Go to Setup-> Build-> Create-> Apps
Scroll down to section “Connected Apps” and click on “Edit” near your connected app, see figure below.
Scroll down to section “Web App Settings” and paste DNN logout address to the textbox named “Single Logout URL” (in our example it’s ‘https://dnn742.test/logoff’), see figure below.
If all steps are done it’s time to test log-off procedure. If SLO works OK we can see following two scenarios:
- When user initiate log-off from DNN website, he should be signed off from DNN and Salesforce website.
- When user initiate log-off from Salesforce website, he should be signed off from DNN and Salesforce website.