7. Single Sign-on
Note
Objective of this chapter is to show how to automatically sign in users to DNN website.
7.1. Overview
“AD-Pro Authentication v3” module have an option to login to DNN without entering any credentials, we call it Single Sign-on (SSO). This scenario is possible only in intranet company networks. In addition, other conditions must be met and configuration steps can be tricky so please read whole chapter before you proceed. SSO is created at the top of the NTLM or Kerberos protocols, that are used in IIS Windows authentication [1].
Note
Before you start configuring SSO make sure that manual login is working properly.
7.2. Requirements
Following general conditions must be meet for SSO:
- IIS server where DNN website is located, must be part of the Active Directory system,
- before using SSO, user needs to be signed in to Active Directory,
- user who will use SSO must have correct file permissions to the folder where DNN website is located,
- The SSO is using Kerberos protocol, these means that both the client and server need to have access to a shared Kerberos Key Distribution Centre (KDC),
- web browser (IE/Firefox/Chrome) must be properly configured,
- finally the ‘AD-Pro Authentication’ plugin needs to be properly configured,
7.3. IIS Configuration
From the Internet Information Services (IIS) perspective following conditions must be met. First of all, DNN website needs to be hosted on IIS server, that is part of Active Directory domain. It’s because between IIS and AD needs to be set up Kerberos [2] or NTLM protocol.
Furthermore, in IIS “Authentication” section for DNN website root folder, must be configured as described on figure below:
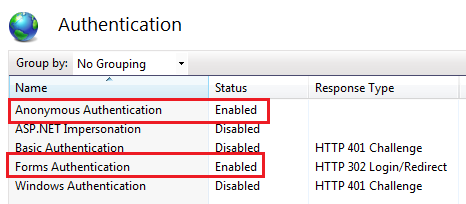
- Anonymous Authentication - Enabled,
- Forms Authentication - Enabled,
- Windows Authentication - Disabled,
- optionally ASP.NET Impersonation can be enabled,
Please note that on figure above ‘Windows Authentication’ is disabled, remember this is for the DNN website root.
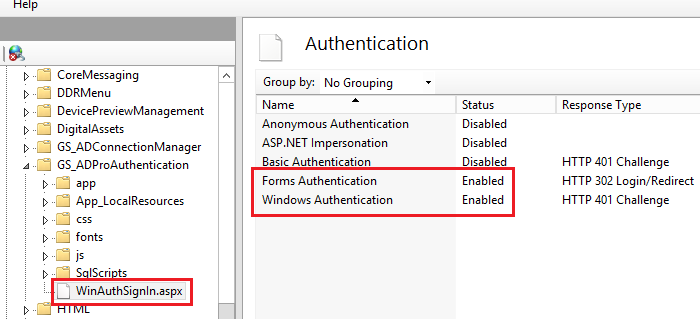
‘Windows Authentication’ should be enabled for only one file: ~\DesktopModules\GS_ADProAuthentication\WinAuthSignIn.aspx
At the intalation process, ‘AD-Pro Authentication’ plugin automatically adds following code snippet to the web.config file, that enables ‘Windows Authentication’ for the WinAuthSignIn.aspx page:
<location path="DesktopModules/GS_ADProAuthentication/WinAuthSignIn.aspx">
    <!-- Disable Forms Authentication -->
    <formsAuthenticationWrapper enabled="false" />
    <system.webServer>
    <security>
        <!-- Enable IIS Windows authentication for the login page -->
        <authentication>
        <windowsAuthentication enabled="true" />
        <anonymousAuthentication enabled="false" />
        </authentication>
    </security>
    </system.webServer>
</location>
In result broker page WinAuthSignIn.aspx should be configured as on figure below.
It’s wort to note that to see what authentication settings has page WinAuthSignIn.aspx, you must follow procedure below:
- In IIS click on
GS_ADProAuthenticationfolder.- Select
Content Viewoption, that is at the bottom of IIS console.- Right mouse click on
WinAuthSignIn.aspxfile.- From the context menu select
Switch to Features View.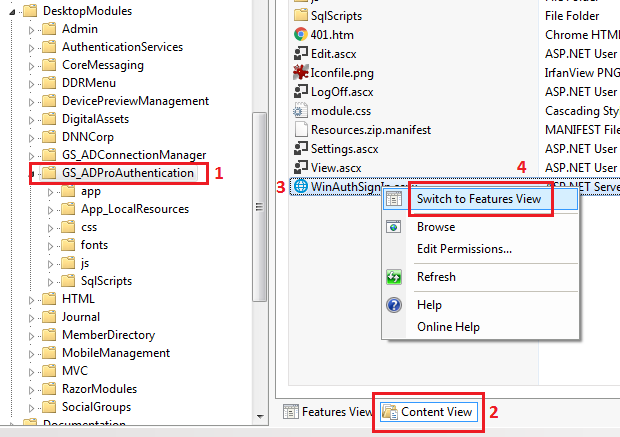
7.4. AD-Pro Authentication configuration
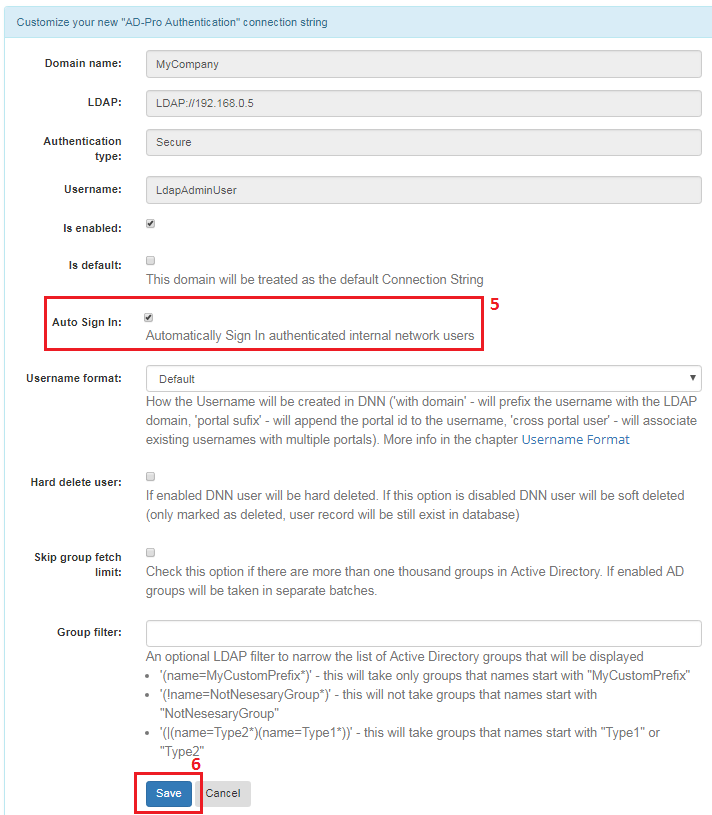
In ‘AD-Pro Authentication’ only one checkbox needs to be turned on, to enable Single Sign-on.
Sign in to the DNN website as a ‘DNN Host’ or ‘DNN Administrator’.
Go to page where ‘AD-Pro Authentication’ module is placed.
Set DNN into ‘Edit’ mode, then go to ‘Module Options’, see figure below.
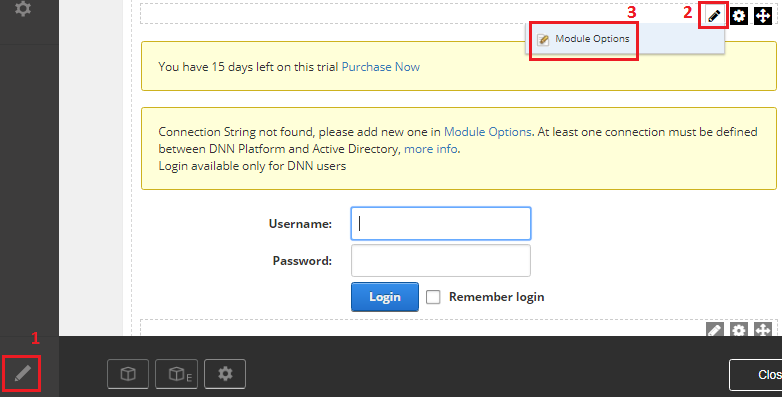
Click on ‘Details’ button to display connection settings.
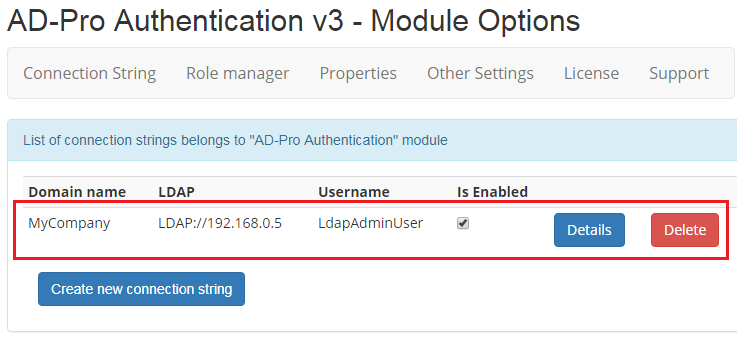
Enable checkbox near ‘Single Sign-on’ attribute and click ‘Save’, see figure below.
7.5. Web browser configuration
Web browser where DNN website is rendered, needs to expose user identity. Using this identity DNN is able to recognize user and SSO can happen. We strongly recommend configure Internet Explorer browser as a first one. If IE will work, you can focus on other browsers. We couldn’t set up SSO with Safari.
7.5.1. Internet Explorer
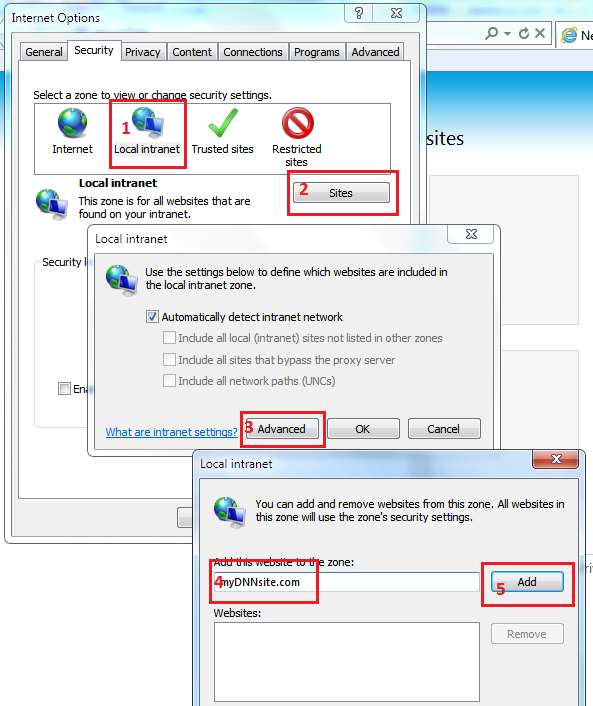
For the Internet Explorer execute following steps. First add DNN website to the local intranet.
- Open Internet Explorer web browser.
- Go to
Tools->Internet options. - Open
Securitytab. - Click on
Local IntranetthenSitesbutton. - Click on
Advancedbutton (skip this step if popup will not be displayed). - List of intranet websites will be displayed, make sure that your DNN website is on it. If not, enter website name into
Add this website to the zonetext box and clickAddbutton. - See figure below for more info.
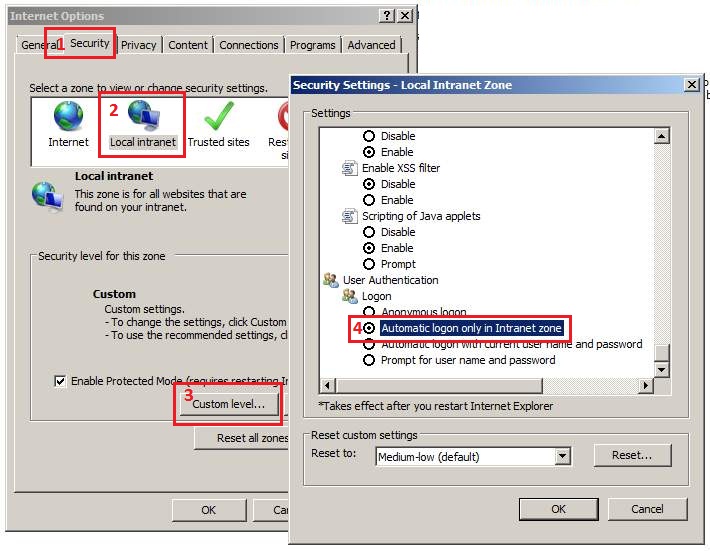
Second, enable Automatic logon:
- Open Internet Explorer web browser.
- Go to
Tools->Internet options. - Open
Securitytab. - Click on
Local IntranetthenCustom levelbutton. - Inside
Security settingsenableAutomatic logon only in Intranet zone. - Save settings.
- See figure below for more info.
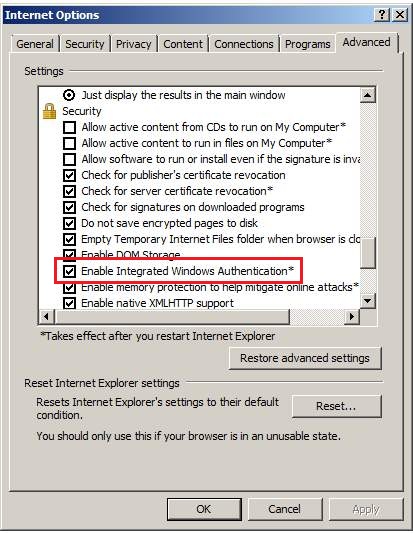
Thirdly, enable Integrated Windows Authentication
- Open Internet Explorer web browser.
- Go to
Tools->Internet options. - Open
Advancedtab. - Make sure that
Enable Integrated Windows Authenticationis enabled (ticked). This option takes effect after you restart Internet Explorer. - See figure below for more info.
7.5.2. Chrome
Chrome uses the same intranet settings as Internet Explorer, so if it’s working in IE it will also work in Chrome (without any additional settings).
7.5.3. FireFox
To configure Firefox browser follow steps below:
- Put string
about:configin url address field and press enter. - In filter box type
network.automatic-ntlm-auth.trusted-uris - Modify
network.automatic-ntlm-auth.trusted-uris, add url of your DNN domain or IP address. - To specify all subdomains use
.replacewithyoursite.cominstead of:www.replacewithyoursite.com,help.replacewithyoursite.com,pictures.replacewithyoursite.com
7.6. Auto SSO
Note
The objective of this section is to show how to transparently sign in users to the DNN website.
By default Single Sign-On process looks as follow:
- User first needs to click on
Loginlink (in the top right corner). - User is redirected to the DNN login page.
- The ‘AD-Pro Authentication’ module that is on the
Loginpage automatically log-in user to DNN. - User is redirected back to the starting page.
This process can be even simpler.
The point is to restrict access for “Guests”, for all DNN pages.
As a result, all new users (“Guests”) will be automatically redirected to the DNN Login page, where the SSO will happen.
Set permissions for DNN pages according to figure below.
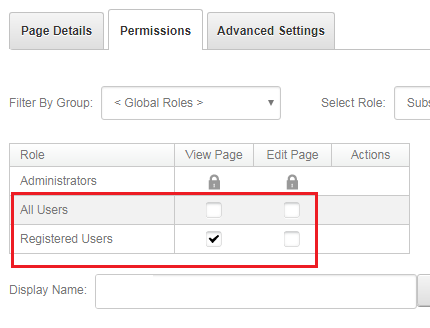
This scenario initiates a transparent login process, where users are always automatically signed in to DNN website.
7.7. Skip SSO
If you want to skip auto SSO, for example to sign in as DNN “host” or “admin”,
a special query string parameter needs to be added to the login page: sso=false.
The url address can look as follow: www.MyDnn.com\login.aspx?sso=false
7.8. SPN & Kerberos
To use SSO which is in fact Kerberos authentication, the following conditions must be met. Usually default AD configuration is OK, but if for some reason SSO will fail, it’s good to get familiar with this chapter.
the client and server computers must be part of the same Windows domain, or in trusted domains,
Service Principal Name (SPN) [3] must be registered [4] with Active Directory, which assumes the role of the Key Distribution Center in a Windows domain. The SPN, after it is registered, maps to the Windows account that started the Internet Information Server (IIS) instance service. If the SPN registration has not been performed or fails, the Windows security layer cannot determine the account associated with the SPN, and Kerberos authentication will not be used,
to use Kerberos [2] authentication, a service must register its service principal name (SPN) [3] under the account in the Active Directory directory service that the service is running under. The service principal name (SPN) is a multivalued attribute. It is usually built from the DNS name of the host. The SPN is used in the process of mutual authentication between the client and the server hosting a particular service. The client finds a computer account based on the SPN of the service to which it is trying to connect. The SPN can be modified by members of the Domain Admins group. By default, Active Directory registers the network basic input/output system (NetBIOS) computer name. Active Directory also permits the Network Service or the Local System account to use Kerberos,
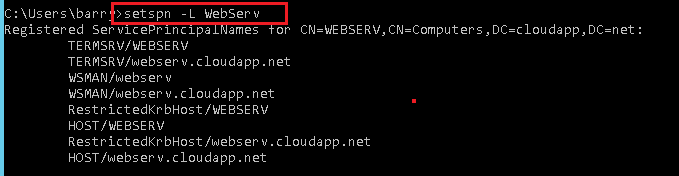
SPN is nothing more fancy than an alias (or pointer) for a domain account. Let’s say that ther is a Windows Server 2012 server called
WebServ(with IIS) that is member of the Active Directory domaincloudapp.net. On the web server you have DNN application that is using url http://webserv.cloudapp.com below is output of asetspn -lcommand [4]:HOST/WEBSERV HOST/webserv.cloudapp.net
7.9. SSO Troubleshooting
Here is a list of common issues that you can meet configuring SSO for Active Directory. Before you contact Glanton Support, take a look at our guide to the most common SSO problems that could be fixed.
7.9.1. Hosts file
By default SSO will not work for sites that are specified in: C:\Windows\System32\drivers\etc\hosts file.
IE will not auto log you into the site, nor will you be able to login by providing the correct credentials.
The reason for this is that in Windows Server 2003 SP1 a new security functionality called “loopback check” was added,
this blocks the authentication request and so for your site to work with the new-host name locally you need to disable the loopback check.
Below is an example how to disable loopback check functionality for CNAME = dnn920.com follow steps:
- Click
Start, clickRun, typeregedit, and then clickOK. - Locate and then click the following registry subkey:
HKEY_LOCAL_MACHINE\SYSTEM\CurrentControlSet\Control\Lsa\MSV1_0 - Right-click
MSV1_0, point toNew, and then clickMulti-String Value. - In the Name column, type
BackConnectionHostNames, and then pressENTERkey. - Right-click
BackConnectionHostNames, and then clickModify. - In the
Valuedata box, type thednn920.com. - Exit Registry Editor, and then restart the computer.
- Type each host name on a separate line. If the
BackConnectionHostNamesregistry entry exists as aREG_DWORDtype, you have to delete theBackConnectionHostNamesregistry entry.
More info can be found in this post
7.9.2. Error screen for external users
When SSO is enabled all users can transparently sign in from inside the company, but external users encounter inconvenience. If somebody want to see website from outside company, an web browser will display security login popup, like on the screen below:
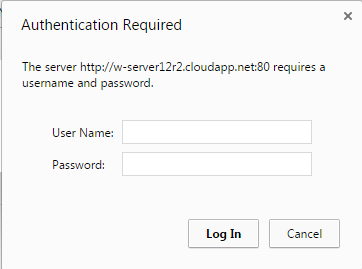
Login popup rendered for external users (Chrome version)
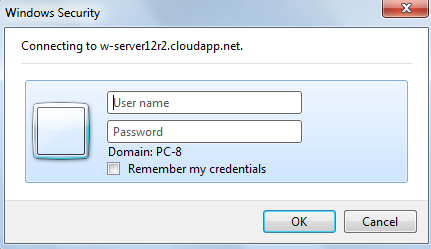
Login popup rendered for external users (Internet Explorer version)
And if user will click Esc or Cancel to skip that popup, another ugly error will appears, see image below:
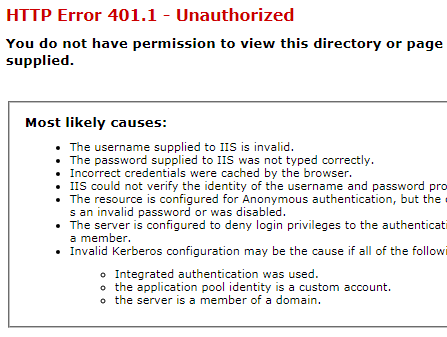
As a workaround we suggest configure costom login page for 401 HTTP erros.
To do that follow seteps below:
Copy file from
~\DesktopModules\GS_ADProAuthentication\401.htmto the DNNbindirectory.Add to the
web.configfile, under section<system.webServer>, folowing entry:<httpErrors errorMode="Custom"> <remove statusCode="401" /> <error statusCode="401" path="401.htm" responseMode="File" /> </httpErrors>
Now security popup will still appears, but when user click Esc or Cancel button, he will be redirected to the login page.
The “Windows Security” login popup issue is a result of Kerberos protocol, and for now we don’t know how to get around it.
Unfortunately, this redirection must be a static file, thus it will not process an ASP.NET framewrok.
Therefore you lose the original ReturnUrl in these redirections, because static html file can’t have nothing dynamic.
401.htm file contains JavaScript code, to automatically redirect to the DNN logon page.
7.9.3. Login screen after user inactivity
In SSO mode, users can get login popup after certain period of inactivity. Usually it’s because cookie expiration, that can be easily extended to 5 days (7200 min.):
- Open the
web.configfile. - Go to section
<configuration> -> <appSettings>, - For key
PersistentCookieTimeoutset value7200, example:<add key="PersistentCookieTimeout" value="7200" />
7.9.4. Kerberos fails
SSO works at the top of the Kerberos protocol, please get familiar with:
- this article that could help diagnose Kerberos issues,
- and this article that could help properly configure Kerberos;
7.9.5. HTTP Error 500.19 – Internal Server Error
If at the SSO login process, browser returns 500.19 HTTP error code like below:
HTTP Error 500.19 – Internal Server Error

The requested page cannot be accessed
because the related configuration data for the page is invalid.

This configuration section cannot be used at this path.
This happens when the section is locked at a parent level.
Locking is either by default (overrideModeDefault="Deny"),
or set explicitly by a location tag with overrideMode="Deny"
or the legacy allowOverride="false".
To get rid of that error special commands needs to be executed [6]. Open the Windows Command Line CMD under Administrator priviledges and execute following two commands:
%systemroot%\system32\inetsrv\APPCMD unlock config /section:anonymousAuthentication

%systemroot%\system32\inetsrv\APPCMD unlock config /section:windowsAuthentication
These unlocking commnads will allow web.config to apply folllowing config:
  <location path="DesktopModules/GS_ADProAuthentication/WinAuthSignIn.aspx">
  <!-- Disable Forms Authentication -->
  <formsAuthenticationWrapper enabled="false" />
  <system.webServer>
    <security>
      <!-- Enable IIS Windows authentication for the login page -->
      <authentication>
        <windowsAuthentication enabled="true" useKernelMode="false">
          <providers>
            <clear />
            <add value="NTLM" />
          </providers>
        </windowsAuthentication>
        <anonymousAuthentication enabled="false" />
      </authentication>
    </security>
  </system.webServer>
</location>
Just keep in mind that unlocking the section is applied globally [6].
References
| [1] | Microsoft doc explaining IIS and Windows Authentication |
| [2] | (1, 2) Microsoft doc explaining Kerberos protocol |
| [3] | (1, 2) More info about SPN |
| [4] | (1, 2) Registering SPN |
| [5] | Things to check when Kerberos fails |
| [6] | (1, 2) Microsoft doc explaining IIS authentication mechanism |