4. Base Configuration
Objective
Show how set up initial envoironment for “Salesforce Authentication SPI” plugin.
Prerequisite
Before you start configuring, make sure that plugin is installed.
4.1. Overview
In this chapter we will explain how to set up connection between Dotnetnuke and Salesforce website. We will start from Salesforce side, where we provide info about our DNN website. Then on DNN side we enter Salesforce coordinates.
Tip
As a result a trust relationship will be created between Salesforce and DNN. DNN trust that the Salesforce has authenticated the user.
Service Provider (SP) - in our case is a Dotnetnuke website.
Identity Provider (IdP) - in our case it’s Salesforce website.
Before you go through configuration process, I encourage to get familiar with SP-initiated SSO section.
4.2. Salesforce Config
Objective
Explain how to expose Identity Provider from Salesforce website.
4.2.1. Custom domain
Important
After you deploy your new domain name, you can’t reverse it!
First you need define a custom domain for your Salesforce website [1] [2]. It can be done only once, after you deploy it, you can’t reverse it! Please check if it already exist before you proceed. Domain is also available for sandbox environments.
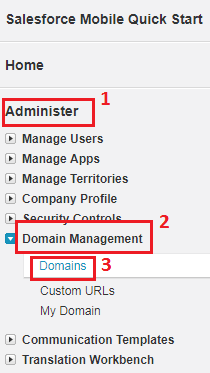
To create new domain please follow steps below:
Go to Setup-> Administer-> Domain Management-> Domains, see figure below:
Enter domain name, and proceed procedure, see figure below:
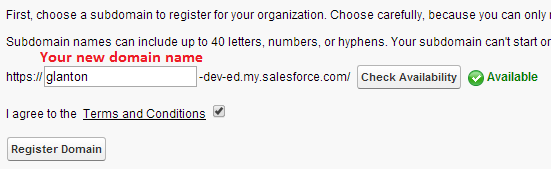
Domain is created, but the DNS propagation takes about 20 min. After that login to Salesforce using newly created domain, test it.
4.2.2. Enable Identity Provider
You need inform Salesforce system that you want to treat it as Identity Provider. To do that follow steps below:
Login to Salesforce with
Administratorpriviledges.Go to Setup-> Security Controls-> Identity Provider then click on
Enable Identity Provider. See figure below for more info: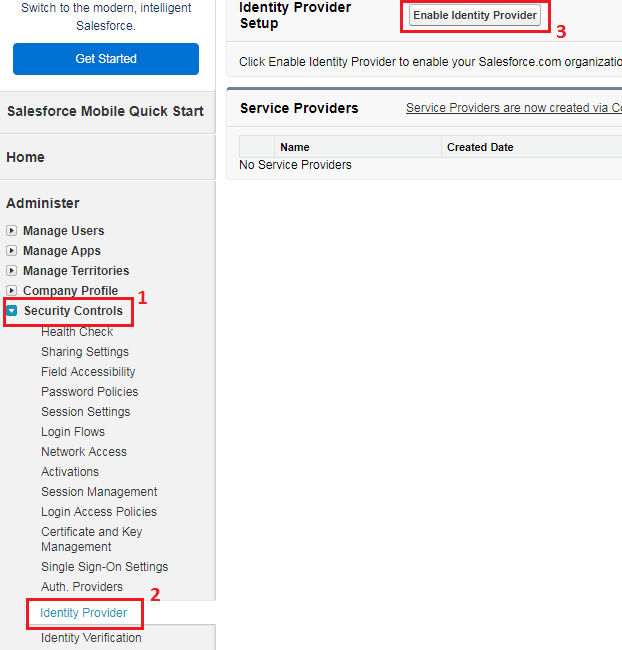
Choose certificate. Default self-signed certificate is okey to use.
4.2.3. Create Connected App
Salesforce “Connected App” [3] will create bridge between Salesforce and Dotnetnuke. It will expose API at the top of SAML protocol. Additionally it allows define various security policies and have explicit control over who can use the corresponding apps. Follow the steps below to define “Connected App”.
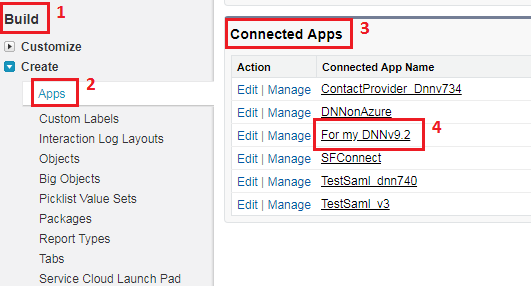
Go to: Setup-> Build-> Create-> Apps and click
Newin “Connected Apps” section. See figure below: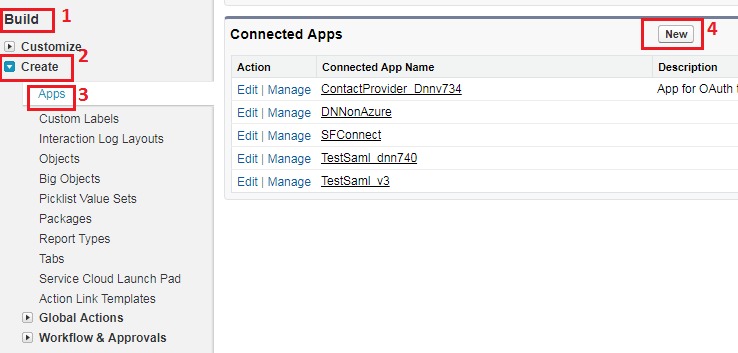
Fill the form: enter name and email address for newly created “Connected App”, then enable option
Enable SAML, see figure below for more info: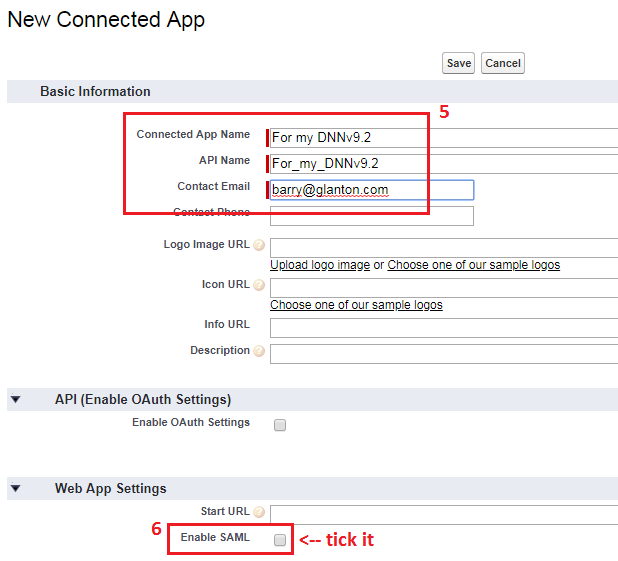
Inside the “Web App Settings” section enter
Entity Idit’s a unique string across all “Connected Apps”, andACS URLit’s a URL to your DNN login page. Please note that there is also filed calledIssuerthat is equal to Salesforce domain name created in previous steps. See figure below for more info: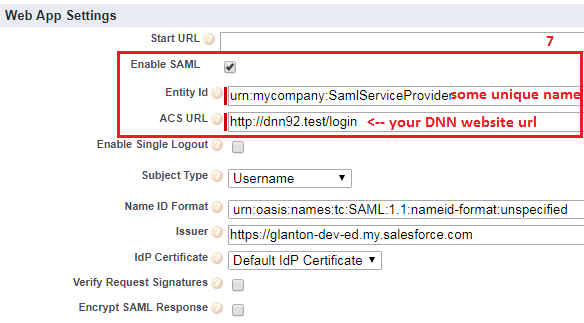
Click
Savebutton to save settings.
4.2.4. Obtain POST Endpoint
DNN needs POST address to initiate connection to Salesforce. To obtain Salesforce POST endpoint, follow the steps below.
Go to Setup-> Build-> Create-> Apps
Scroll down to section “Connected Apps” and click on your connected app, see figure below.
Scroll down to section “SAML Login Information” and copy “SP-Initiated POST Endpoint”, see figure below.
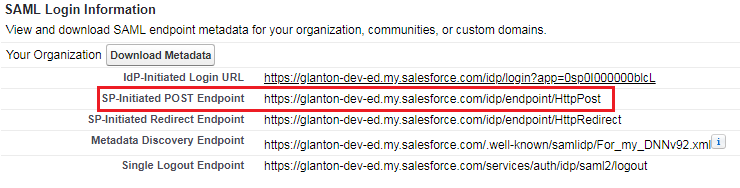
This address needs to be copied to “Salesforce Authentication SPI” config, more details here for more info Provider config
4.2.5. Secure Connected App
In this section we will set security restrictions for newly created “Connected App”. At least one profile needs to be enabled. Follow the steps below.
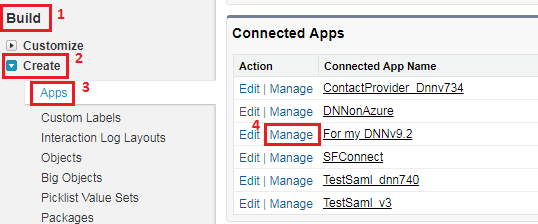
Go to: Setup-> Build-> Create-> Apps, then scroll down to section “Connected Apps” and click on
Managelink near app that was created. See image below:
Scroll down to “Profile” section and click on
Manage Profilesbutton, see figure below: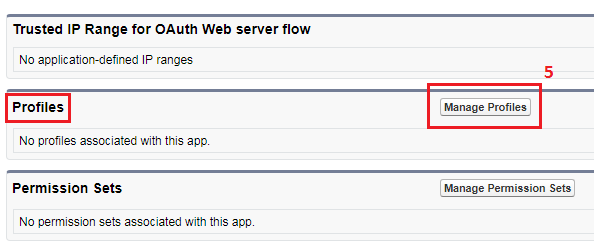
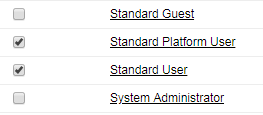
Select profile(s) from the list. Only users belongs to ticked profile(s) will be able to use this “Connected App”, and therefore sign in to DNN website. On figure below was enabled two profiles: “Standard Paltform User” and “Standard User”.
Click
Savebutton to finish.
4.2.6. Profile Mapping
Objective
Explains how to push Salesforce user profile to DNN.
“Salesforce Authentication SPI” allows copy Salesforce user together with his profile to DNN.
If user doesn’t exist in DNN, he will be automatically created.
All these operations: user creation and profile sync, occurs only at the login process.
Steps below will explain how to add one mapping where Salesforce user property FirstName will be connected with DNN user property First Name.
Go to Setup-> Build-> Create-> Apps
Scroll down to section “Connected Apps” and click on connected app that was created.
Scroll down to section “Custom Attributes” and click on
Newbutton, see figure below.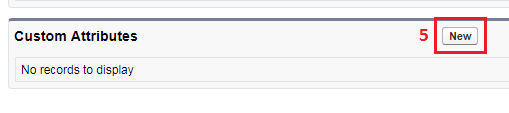
Newly created panel “Create Custom Attribute” has textbox named
Key, enterinto it strigFirstName, and click on buttonInsert Field, see figure below.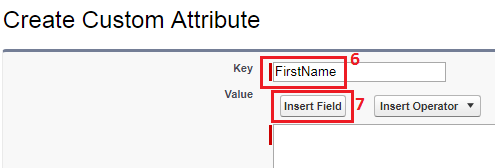
New popup will be displayed named “Insert Field”. Click on
$User>thenFirst Nameand click on buttonInsert, see figure below.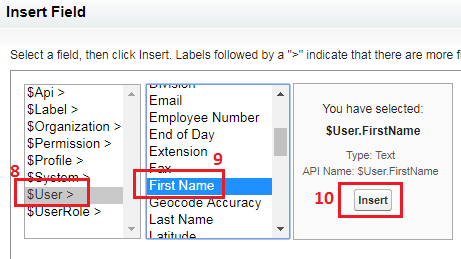
Click on
Savebutton, see image below.
The mapping was successfully created. Now current “Connected App” will export Salesforce user profile property
$User.FirstNameto DNN. From DNN perspective this propety will be visible asFirstName, same as one of the standard DNN profile property.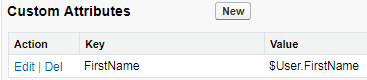
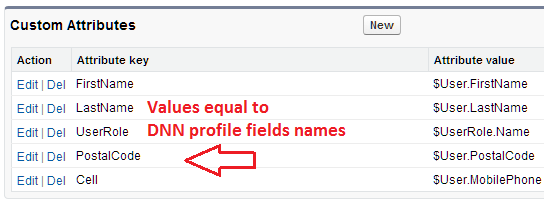
Below is example of possible mappings.
4.3. DNN config
4.3.1. Providing Salesforce coordinates
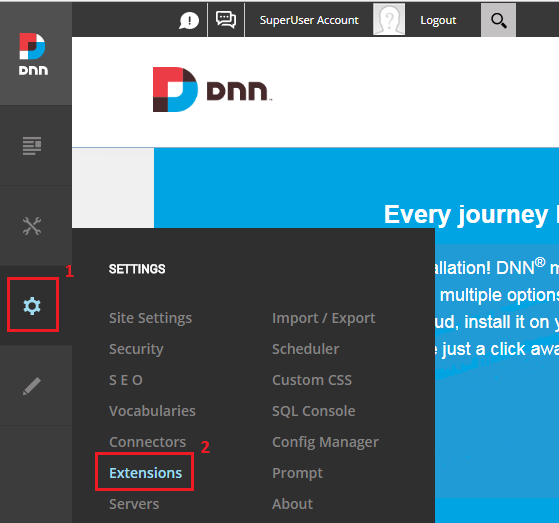
Sign in to the DNN website as a “DNN Host”.
Go to “Settings-> Extensions”, see figure below.
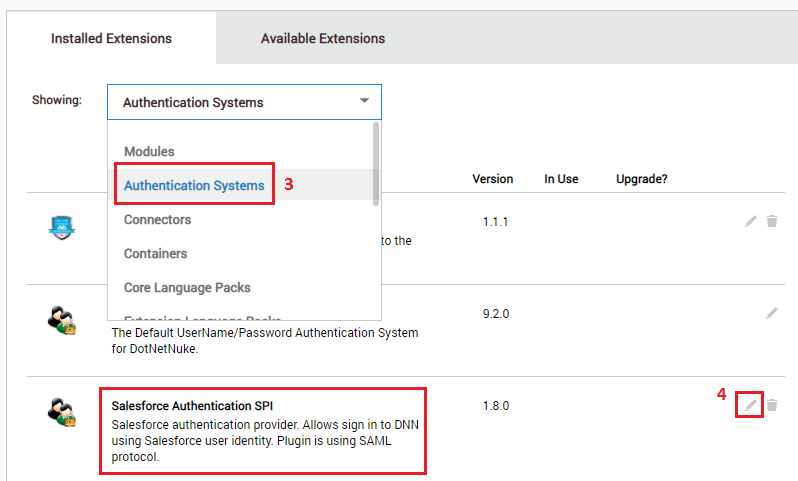
From the drop down list select “Authentication Systems”, then click on pencil icon near the “Salesforce Authentication SPI” plugin, see figure below.
Select “Site Settings” and then “General” tab, see figure below.
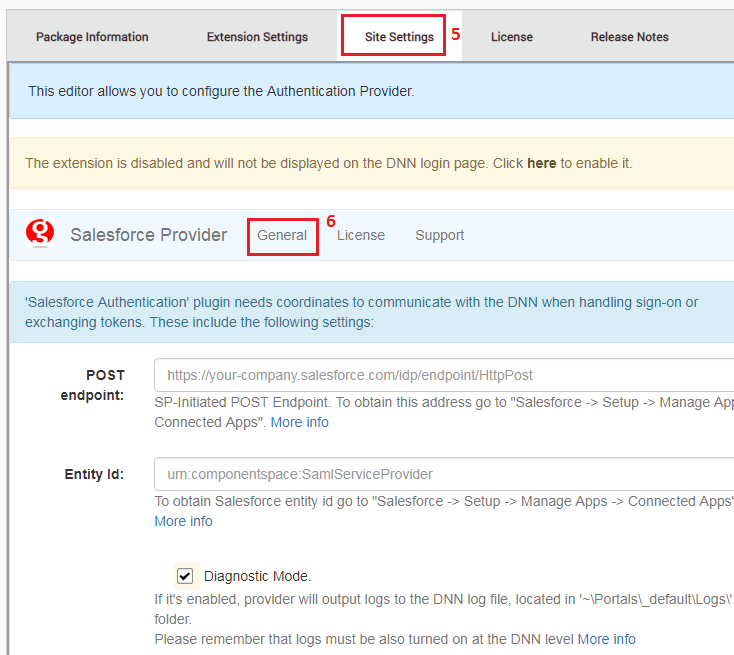
Inside filed “POST Endpoint” enter POST endpoint from “Connected App”, see here Obtain POST Endpoint
Inside filed “Entity Id” enter “Entity Id” from “Connected App”, see here Entity ID
Click
Submit formbutton to save coordinates. “Diagnostic mode” can be optionally enabled. See figure below.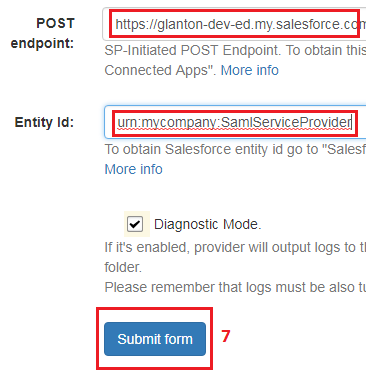
4.3.2. Enable / Disable provider
“Salesforce Authentication SPI” can be enabled or disabled for specified portal as any other plugin. To enable provider folow the seteps below.
Sign in to the DNN website as a “DNN Host”.
Go to “Settings-> Extensions”, see figure below.
From the drop down list select “Authentication Systems”, then click on pencil icon near the “Salesforce Authentication SPI” plugin, see figure below.
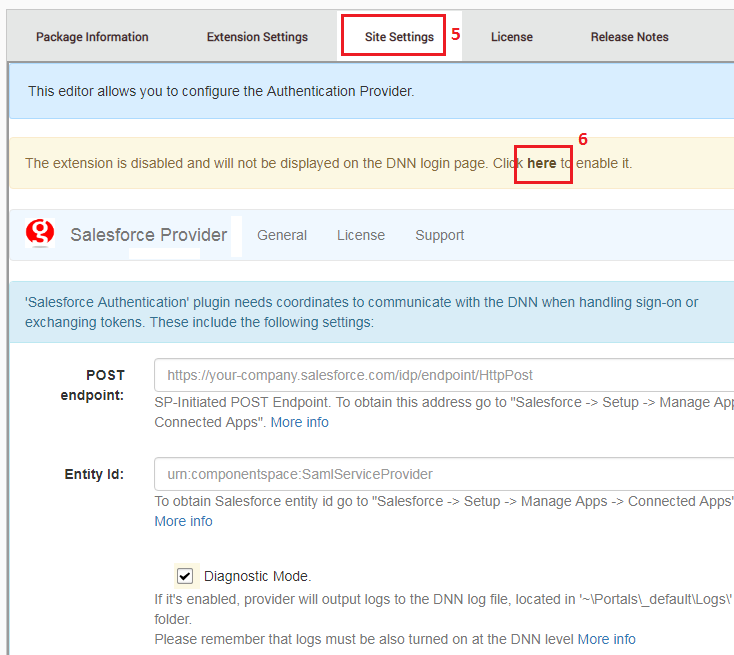
Select “Site Settings”.
To enable provider click on link here, it’s on yellow background, see figure below.
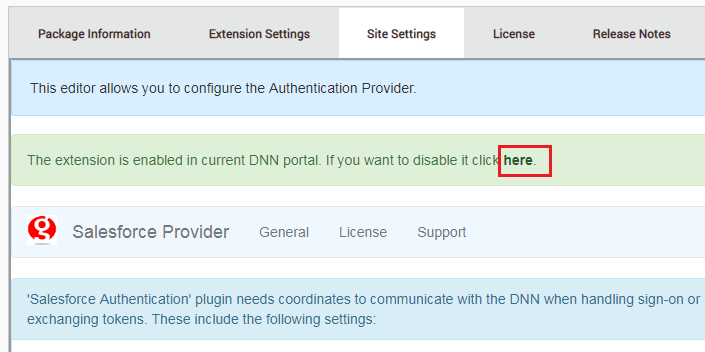
To disable provider click on link here, it’s on green background, see figure below.
References
| [1] | Salesforce doc with overview about Salesforce domain |
| [2] | Salesforce doc explaining How to add Salesforce domain |
| [3] | Salesforce doc with overview about Connected Apps |