8. Troubleshooting
8.1. Diagnostic Mode
Objective
Explain how to collect additional information that will help troubleshoot the issues.
If module doesn’t work as you expect, it’s worth to enable “Diagnostic Mode”.
This will output logs that describes how the module is working.
They can also diagnose issues that can occur like: config errors, failed login process, etc.
Logs are created in file that is located in ~\Portals\_default\LogsYYYY.MM.DD.logs.resources, see log example below:
Logs are created only when plugin is working in “Diagnostic Mode”, to enable it please follow steps below:
Open log4net configuration file
DotNetNuke.log4net.config, it can be found in DNN root folder, see figure below: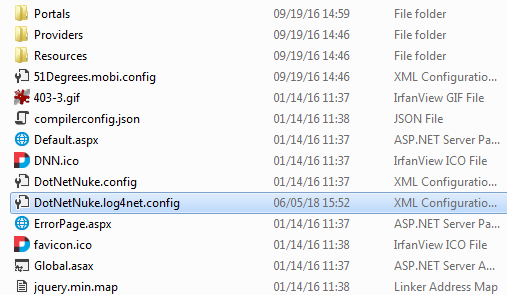
Inside that file set log level to
ALL, see code snippet below:<root> <level value="ALL" /> <appender-ref ref="RollingFile" /> </root>
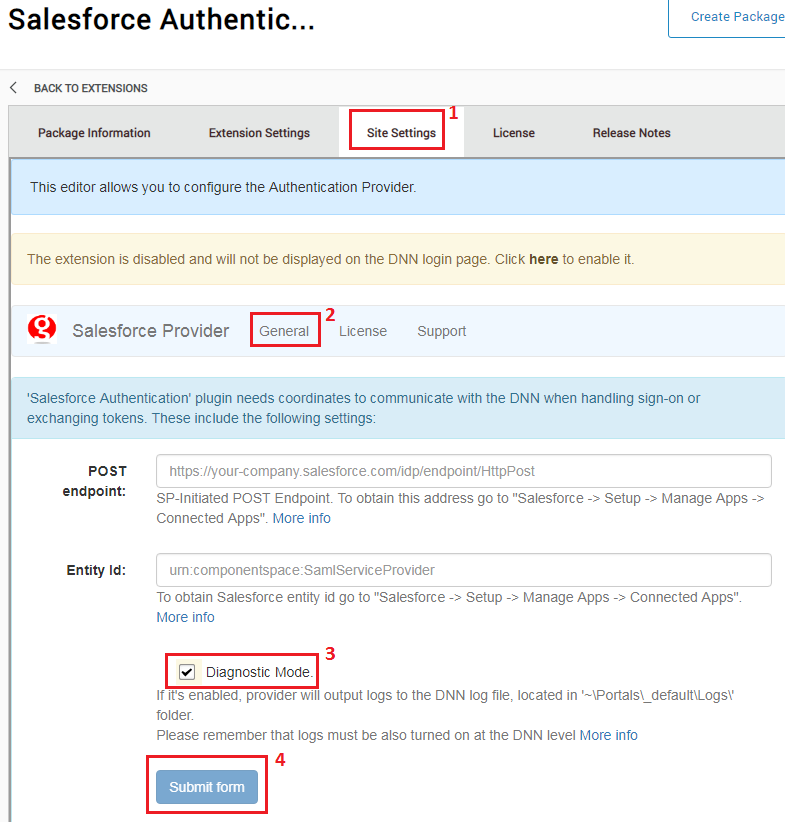
In the “Salesforce Authentication SPI” provider “Site Settings” -> “General” tab, enable attribute “Diagnostic Mode”, see figure below:
Now logging mechanism is turned on, reproduce the sign-in process and check the log file.
8.2. How generate diagnostic logs
Please follow the instructions below on how to generate valuable logs.
First enable diagnostic mode, to do that see instructions from section Diagnostic Mode
Log file is usually very big, which makes it difficult to parse. To remove unncecessary informations, delete log file, before you will reproduce the issue.
Default path to log file is:
~\Portals\_default\Logs\YYYY.MM.DD.resouresReproduce the issue to generate log entries.
Compress log file, and send it to support@glanton.com
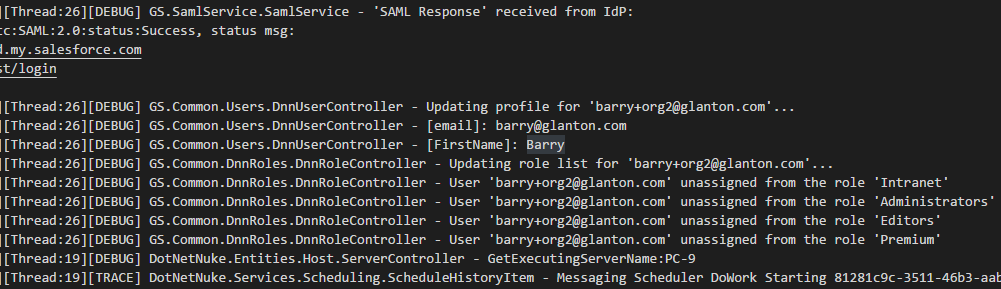
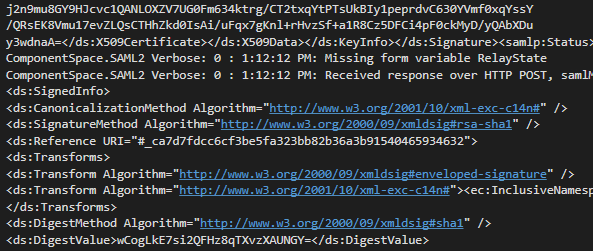
8.3. SAML diagnostics
This section will describe how to obtain details about SAML connection. Connection that is set up between DNN and Salesforce at the login process.
Open
web.configfile that is in your DNN main folder.In
web.configat the end of<configuration>section, just before closing tag</configuration>add following code snippet:<system.diagnostics> <trace autoflush="true"> <listeners> <add name="TextWriter"/> </listeners> </trace> <sources> <source name="ComponentSpace.SAML2" switchValue="Verbose"> <listeners> <add name="TextWriter"/> </listeners> </source> </sources> <sharedListeners> <add name="TextWriter" type="System.Diagnostics.TextWriterTraceListener" initializeData="{path to your DNN website}\DesktopModules\AuthenticationServices\GS_SalesforceAuthentication_SPI\saml.log"/> </sharedListeners> </system.diagnostics>
Note that you need change line (third line from the end) where is
{path to your DNN website}according to your DNN patch.Save
web.configfile.Now in
~\DesktopModules\AuthenticationServices\GS_SalesforceAuthentication_SPIfolder will be created filesaml.logwith SAML connection details.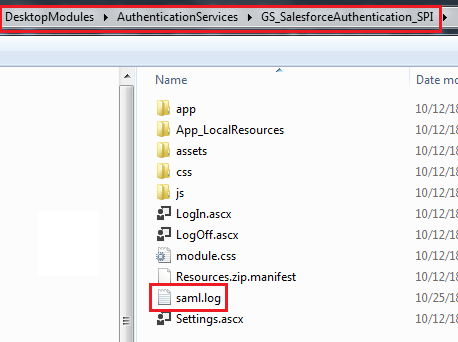
Below is example of that log.
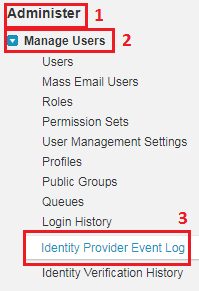
8.4. Logs on Salesforce
Salesforce has a simple tool that collects informations about all login attempts. To display Salesforce login log follow the steps below.
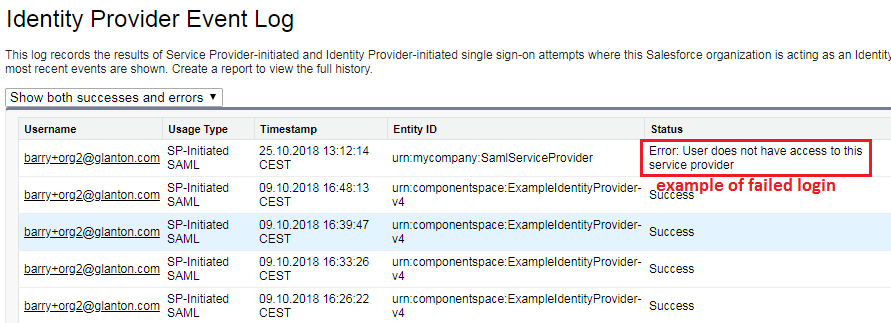
Go to “Setup-> Administer-> Manage Users-> Identity Provider Event Log”, see figure below.
“Identity Provider Event Log” section will be displayed, see figure below.
8.5. JavaScript issues
8.5.1. Overview
User interface is created at the top of AngularJS framework. JavaScript can be moody although it’s very fast. If you will see interface issues, for example view can’t be loaded or displayed, buttons aren’t responding, it’s worth to check JavaScript errors. Depending what browser you are using, check following articles that are describing how to display these errors in your browser:
If you have any problems with your plugin, please send above error messages to support@glanton.com
8.5.2. Edit & Delete buttons doesn’t work
When you can’t update module settings, and JavaScript throws error like Method Not Allowed... or requests throws 405 HTTP error code, please make sure that WebDAV is disabled.
To disable WebDAV, please add following lines to the web.config file, in the section system.webServer-> modules add following line:
<modules>
    <remove name="WebDAVModule"/> <!-- add this -->
    ...
</modules>
in the section system.webServer-> handlers add following line:
<handlers>
    <remove name="WebDAV" />
    ...
</handlers>
the ExtensionlessUrl-Integrated-4.0 handler under the system.webServer-> handlers also applies the verb PUT:
<handlers>
    ...
    <remove name="ExtensionlessUrl-Integrated-4.0" />
    <add name="ExtensionlessUrl-Integrated-4.0" path="*." verb="GET,HEAD,POST,DEBUG,PUT,DELETE" type="System.Web.Handlers.TransferRequestHandler" preCondition="integratedMode,runtimeVersionv4.0" />
    ...
</handlers>
Here you can read more about WebDAV.
If this will not help add following code snippet to the web.config:
<modules runAllManagedModulesForAllRequests="true">
  <!--IISFIX: Whatever this is, it causes 405 Method Not Allowed errors on IIS when using PUT. (Microsoft's broken by defult)-->
  <remove name="WebDAVModule"/>
</modules>
<handlers>
     <!--IISFIX: ASP.net is broken by default. By default they will not accept verbs from the client.
     First we have to rip out everything related to ASP.net-->
    <remove name="ExtensionlessUrlHandler-ISAPI-4.0_64bit"/>
    <remove name="ExtensionlessUrlHandler-Integrated-4.0"/>
    <remove name="ExtensionlessUrlHandler-ISAPI-4.0_32bit"/>
    <remove name="SimpleHandlerFactory-ISAPI-2.0-64"/>
    <remove name="SimpleHandlerFactory-ISAPI-2.0"/>
    <remove name="SimpleHandlerFactory-Integrated"/>
    <remove name="SimpleHandlerFactory-Integrated-4.0"/>
    <remove name="SimpleHandlerFactory-ISAPI-4.0_64bit"/>
    <remove name="SimpleHandlerFactory-ISAPI-4.0_32bit"/>
        <!-- IISFIX: Now that we're ripped out everything related to ASP.net, put them back correctly.-->
    <add name="SimpleHandlerFactory-ISAPI-4.0_32bit" path="*.ashx" verb="*" modules="IsapiModule" scriptProcessor="C:\Windows\Microsoft.NET\Framework\v4.0.30319\aspnet_isapi.dll" resourceType="Unspecified" requireAccess="Script" preCondition="classicMode,runtimeVersionv4.0,bitness32" responseBufferLimit="0"/>
    <add name="SimpleHandlerFactory-ISAPI-4.0_64bit" path="*.ashx" verb="*" modules="IsapiModule" scriptProcessor="C:\Windows\Microsoft.NET\Framework64\v4.0.30319\aspnet_isapi.dll" resourceType="Unspecified" requireAccess="Script" preCondition="classicMode,runtimeVersionv4.0,bitness64" responseBufferLimit="0"/>
    <add name="SimpleHandlerFactory-Integrated-4.0" path="*.ashx" verb="*" type="System.Web.UI.SimpleHandlerFactory" resourceType="Unspecified" requireAccess="Script" preCondition="integratedMode,runtimeVersionv4.0"/>
    <add name="SimpleHandlerFactory-Integrated" path="*.ashx" verb="*" type="System.Web.UI.SimpleHandlerFactory" resourceType="Unspecified" requireAccess="Script" preCondition="integratedMode"/>
    <add name="SimpleHandlerFactory-ISAPI-2.0" path="*.ashx" verb="*" modules="IsapiModule" scriptProcessor="%windir%\Microsoft.NET\Framework\v2.0.50727\aspnet_isapi.dll" resourceType="Unspecified" requireAccess="Script" preCondition="classicMode,runtimeVersionv2.0,bitness32" responseBufferLimit="0"/>
    <add name="SimpleHandlerFactory-ISAPI-2.0-64" path="*.ashx" verb="*" modules="IsapiModule" scriptProcessor="%windir%\Microsoft.NET\Framework64\v2.0.50727\aspnet_isapi.dll" resourceType="Unspecified" requireAccess="Script" preCondition="classicMode,runtimeVersionv2.0,bitness64" responseBufferLimit="0"/>
    <add name="ExtensionlessUrlHandler-ISAPI-4.0_32bit" path="*." verb="*" modules="IsapiModule" scriptProcessor="C:\Windows\Microsoft.NET\Framework\v4.0.30319\aspnet_isapi.dll" resourceType="Unspecified" requireAccess="Script" preCondition="classicMode,runtimeVersionv4.0,bitness32" responseBufferLimit="0"/>
    <add name="ExtensionlessUrlHandler-Integrated-4.0" path="*." verb="*" type="System.Web.Handlers.TransferRequestHandler" resourceType="Unspecified" requireAccess="Script" preCondition="integratedMode,runtimeVersionv4.0"/>
    <add name="ExtensionlessUrlHandler-ISAPI-4.0_64bit" path="*." verb="*" modules="IsapiModule" scriptProcessor="C:\Windows\Microsoft.NET\Framework64\v4.0.30319\aspnet_isapi.dll" resourceType="Unspecified" requireAccess="Script" preCondition="classicMode,runtimeVersionv4.0,bitness64" responseBufferLimit="0"/>

    <!--IISFIX: WebDAV is also buggy, and interferes with client requests-->
    <remove name="WebDAV"/>

</handlers>
8.5.3. Settings panel not loaded
If website is working at the top of HTTPS protocol and it’s behind the load balancer there could be issue where the user interface is not displayed at all.
Usually it’s because JavaScript files reqired by the AD-Pro plugin are trying to be requested via HTTP protocol instead of HTTPS.
To confirm that please check the source code of the DNN page where the Glanton plugin is (click CTRL+U), and look for a string SERVER_DOMAIN or SERVER_DOMAIN_JS, see attached picture.
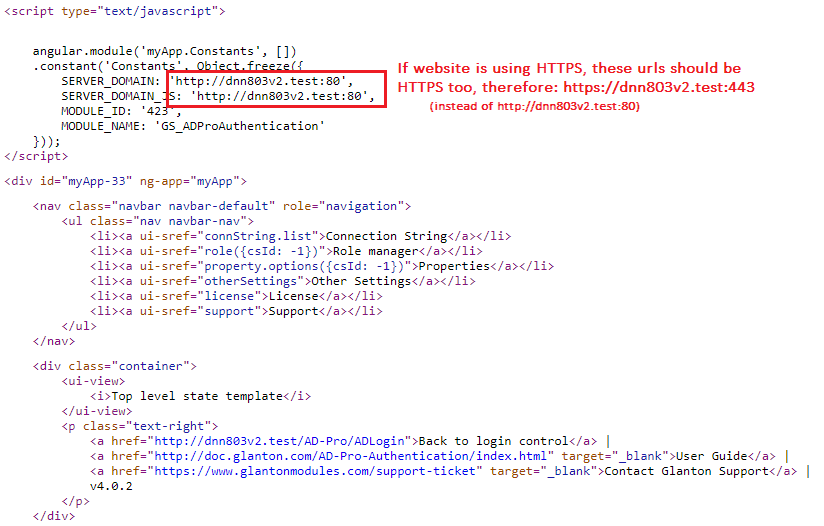
To correct this issue the DNN website needs to know that we are using HTTPS.
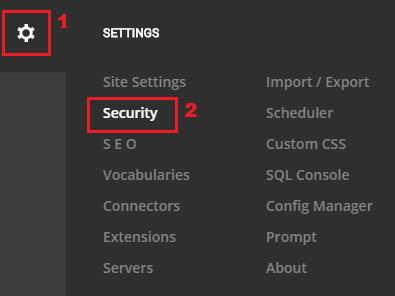
Sign in as DNN Administrator or Host.
Go to “Security” menu, see figure below.
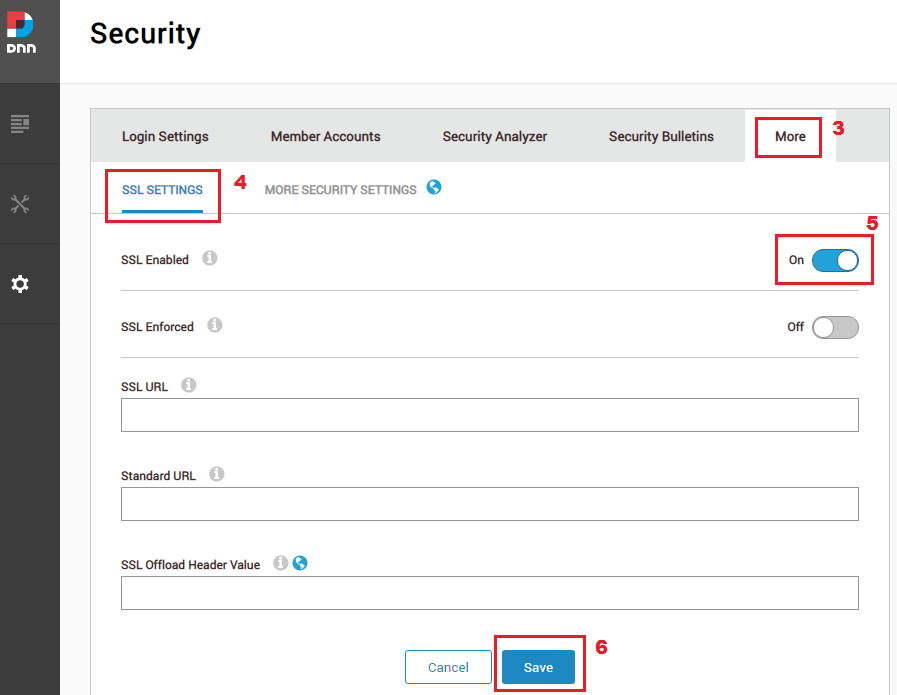
Click on tab “More” then “SSL SETTINGS”. Enable option “SSL Enabled” and save settings, see figure below.
To confirm check the page source once again.
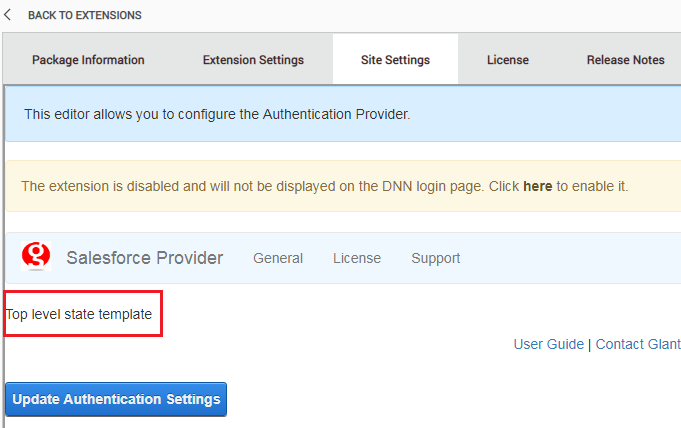
8.5.4. View can’t be loaded
If you see situation like on figure below, where only upper part of interface is loaded and instead of bottom part of interface is displayed message Top level state template, probably it’s caused by minified js file.
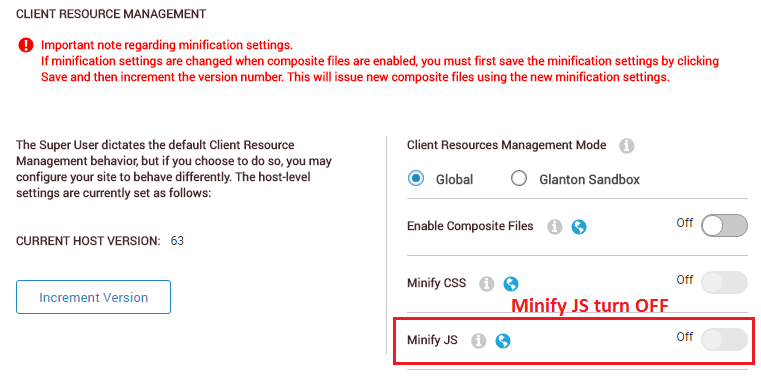
To fix that issue sign in as DNN host and go to menu “Servers-> Server Settings”.
At the bottom is section responsible for reducing Java Script files, please disable Minify JS attribute. See figure below for more info.
8.6. Authn failed - User does not have access…
If right after success sign-in on Salesforce login page, you are redirected to DNN website that throws error message like on figure below:
 You dont have permissions to access Salesforce service provider. urn:oasis:names:tc:SAML:2.0:status:AuthnFailed
Please check if in Salesforce platform your “Connected App” has set all security permissions. In particular check if “Profile” are set, see here for more info Secure Connected App